


The Best Foundation Crack Fillers in 2026: Stop Leaks Before They Get Worse
Finding the best foundation crack filler can feel overwhelming — but here’s a quick answer before we dive in:
Best foundation crack fillers at a glance:
| Product / Type | Best For | Crack Width | DIY Friendly |
|---|---|---|---|
| Polyurethane injection kit (e.g. uPLUG, RadonSeal) | Leaking poured concrete walls | Up to 1/2″ | Yes |
| Epoxy injection (e.g. Sikadur Crack Fix) | Structural strength, dry cracks | Hairline to 1/4″ | Moderate |
| Hydraulic cement (e.g. DRYLOK Fast Plug) | Active water gushing | Up to 1″ | Yes |
| Self-leveling sealant (e.g. Sikaflex) | Horizontal surfaces, driveways | Up to 2″ | Yes |
| Surface patch (e.g. Rust-Oleum Concrete Patch) | Cosmetic repairs | Wide gaps | Yes |
A crack in your basement wall isn’t just an eyesore. It’s an open door for water, moisture, radon gas, and musty odors to enter your home. And if you’ve already dealt with a wet basement, you know how quickly a small leak can become a big — and expensive — problem. Full professional waterproofing typically runs between $4,000 and $8,000, so it’s no surprise that many homeowners look for the right DIY product first.
The challenge is that not all cracks are the same, and neither are the products designed to fix them. A hairline shrinkage crack needs a completely different solution than a horizontal crack from soil pressure. Using the wrong filler can mean a failed repair — or worse, a false sense of security while water quietly damages your foundation.
I’m Darin Garvey, owner of Basement Waterproofing Scientists in the Philadelphia area, with over 30 years of combined experience diagnosing and repairing exactly the kind of foundation leaks that send homeowners searching for the best foundation crack filler. In this guide, I’ll walk you through the top-rated products, how to choose the right one, and when a DIY fix is enough — and when it isn’t.
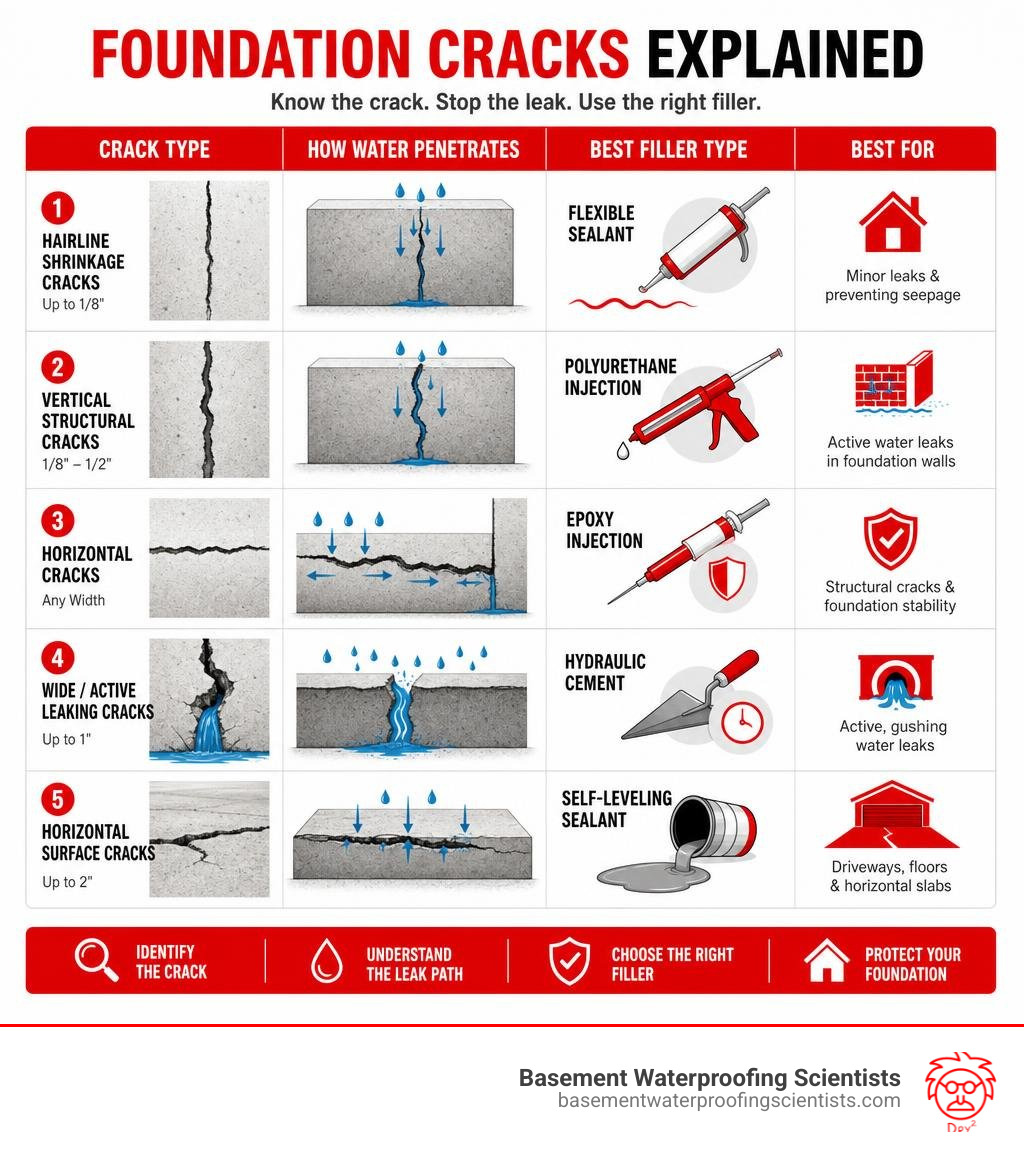
Best foundation crack filler terms to remember:
Understanding Foundation Crack Types and Repair Methods
Before you grab a caulking gun or a tub of hydraulic cement, you need to know exactly what kind of crack you are dealing with. Treating a structural warning sign as a simple cosmetic nuisance is a recipe for disaster.
In our 30 years of servicing homes across Southeastern Pennsylvania, South Jersey, and Delaware, we have seen every type of crack imaginable. Let’s break down what your foundation is trying to tell you.

- Vertical Cracks: These are the most common cracks we see in cracks in poured concrete foundation walls. Usually caused by the natural shrinking of concrete as it cures or minor settling, they run straight up and down (or slightly diagonal). While they are rarely structural threats, they are notorious for leaking water during heavy rains.
- Horizontal Cracks: If you see a crack running horizontally across your basement wall, do not ignore it. This is a classic sign of hydrostatic pressure — the water-saturated soil outside is pushing hard against your foundation. Over time, this pressure causes walls to bow inward. These are highly structural and require professional evaluation before any DIY cosmetic cover-up is attempted.
- Diagonal Cracks: Often wider at the top than the bottom, diagonal cracks indicate uneven settling of your home’s foundation. One side of the footing is sinking faster than the other.
- Hairline Cracks: Typically less than 1/16 inch wide, these are common in both new and old homes. They are usually cosmetic but can still allow radon gas and moisture vapor to seep into your basement if left unsealed.
- Active Leaks: If water is actively trickling or gushing through a crack, standard fillers will wash away before they can cure. You need specialized materials, like hydraulic cement or hydrophobic polyurethane, that react with water to form an instant seal.
If you are dealing with a block foundation rather than poured concrete, you will need a specialized cinder block crack filler or masonry mortar patch, as block walls are hollow and cannot be repaired using standard high-pressure liquid injection.
No matter the type, it is crucial to ask: do structural cracks get worse over time? The short answer is yes. Changes in soil moisture, freeze-thaw cycles in our Pennsylvania winters, and ongoing house settling mean a small crack today can become a major structural failure tomorrow. Understanding the basics of understanding structural basement repair will help you decide if you can tackle this yourself or if you need to call in the scientists.
Why Polyurethane Injection is Often the Best Foundation Crack Filler
When it comes to stopping water in poured concrete foundation walls, polyurethane injection is the gold standard of the waterproofing industry.
Unlike rigid materials, polyurethane foam is liquid when injected but rapidly expands up to 20 times its original volume when it comes into contact with moisture inside the crack. This massive expansion ratio ensures that the foam penetrates all the way through the foundation wall — from the inside to the outside dirt — filling every hidden void, crevice, and tie-rod hole.
Even better, polyurethane cures into a dense, flexible, closed-cell rubber barrier. Because concrete naturally expands and contracts with seasonal temperature swings, a rigid filler like hydraulic cement or standard epoxy will eventually crack and fail. Polyurethane’s permanent flexibility allows it to stretch and compress with the wall’s natural movement, keeping your basement dry for decades.
For vertical cracks, a professional-grade kit like the Pro Concrete Repair Crack Injection Expanding Foam allows DIYers to achieve the same results as a professional crew. While epoxy crack injection is excellent for structural reinforcement of dry cracks because it cures harder than concrete itself, polyurethane is unmatched for waterproofing active or damp leaks. You can learn more about the nuances of these methods in our guide to basement foundation wall repairing crack injection.
Comparing the Best Foundation Crack Filler Options for DIYers
Every DIY crack repair project has different demands. To help you choose the right tool for the job, we have put together a comparison diagram of the major foundation repair categories:
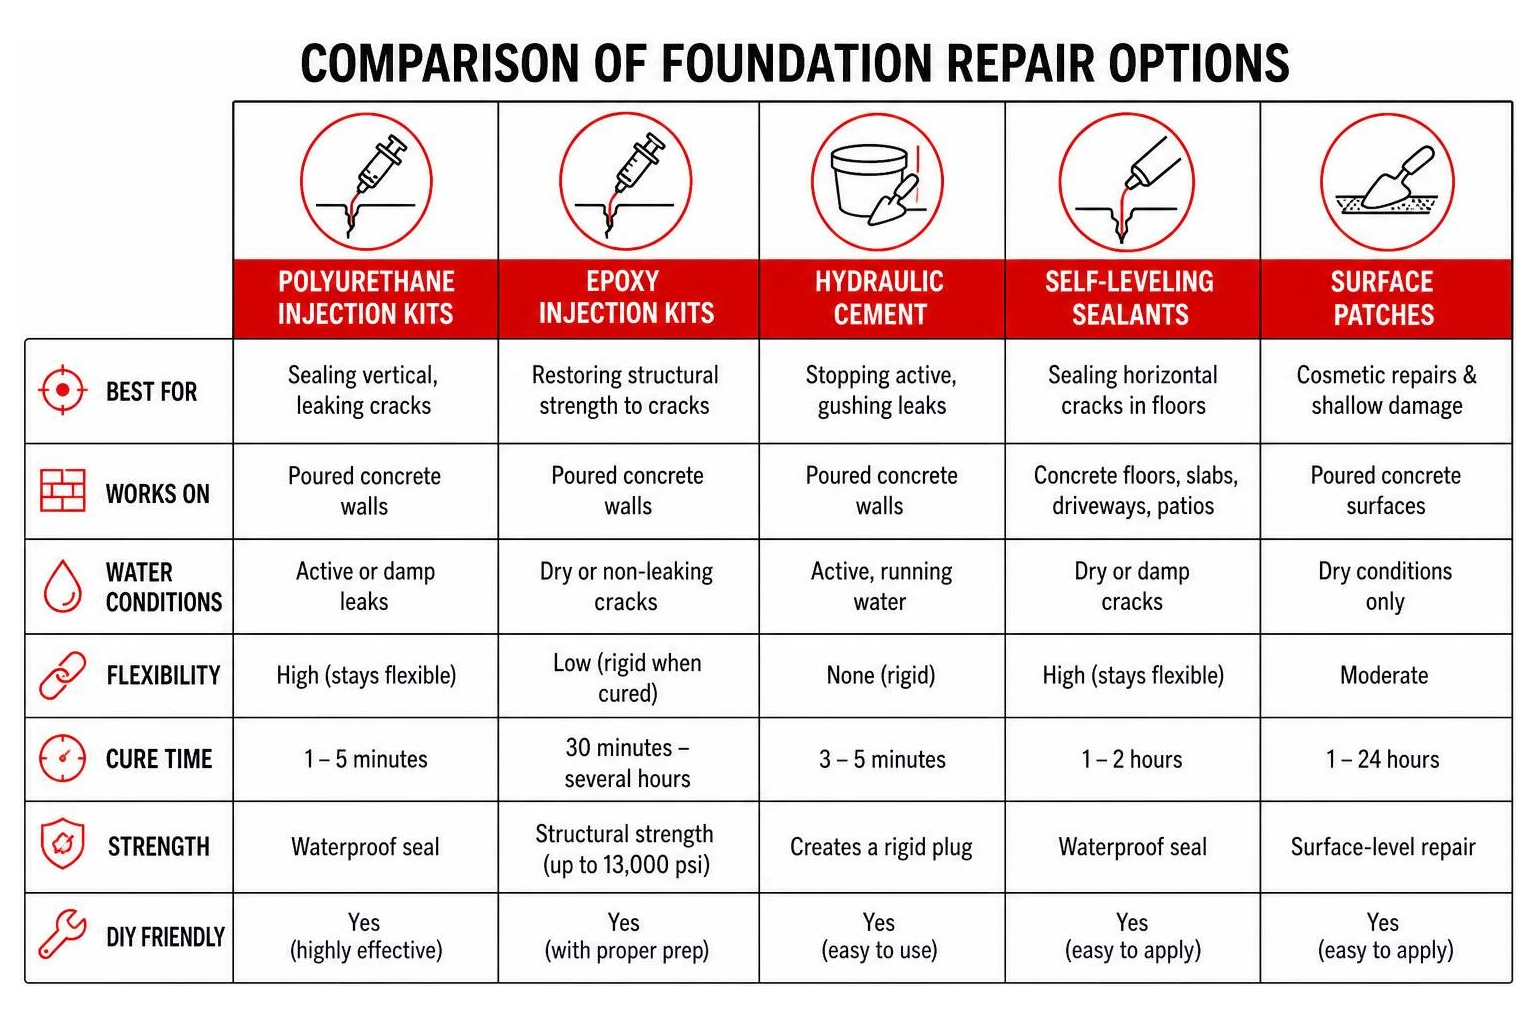
- Polyurethane Injection Kits: These are the ultimate choice for vertical, leaking cracks in poured concrete. They seal the entire thickness of the wall, remaining flexible to handle foundation shifting.
- Epoxy Injection Kits: Best used when you need to restore structural strength to a cracked wall. Epoxy cures to a strength exceeding the concrete itself (often up to 13,000 psi compressive strength), making it ideal for non-leaking, structural cracks.
- Hydraulic Cement: This fast-setting powder mixes with water and cures in 3 to 5 minutes. It actually expands as it sets, making it perfect for plugging active, gushing leaks. However, because it is entirely rigid, it is prone to cracking again if the foundation moves.
- Self-Leveling Sealants: Designed strictly for horizontal concrete cracks (like basement floors, driveways, and patios), these liquid-like polyurethanes flow easily into cracks to create a perfectly flat, waterproof, and flexible seal.
- Surface Patches: Excellent for shallow, cosmetic, or spalling concrete damage. They do not penetrate deeply but provide a clean, paintable surface finish.
For a deeper dive into choosing the right sealant chemistry, check out our best sealant foundation cracks guide and our detailed breakdown where we don’t let your foundation crack up best sealants reviewed.
How to Choose the Best Foundation Crack Filler for Your Home
Choosing the best foundation crack filler depends on several critical variables. Before buying any product, evaluate these four factors:
- Crack Width: Hairline cracks (under 1/16 inch) require ultra-low viscosity liquid sealants that can seep into tight spaces. Medium cracks (1/16 to 1/2 inch) are perfect for expanding polyurethane foams or structural epoxies. Extremely wide cracks (over 1/2 inch) may require a combination of backing rope, sand backfill, and heavy-duty concrete patches.
- Location (Horizontal vs. Vertical): Never use a self-leveling sealant on a vertical wall; it will simply run down the wall and pool on your basement floor. Vertical cracks require thick paste sealers and injection ports, or high-viscosity non-sag caulks.
- Curing Time: If you are trying to stop an active leak, you cannot wait hours for a sealant to dry. You need hydraulic cement that cures in 3 minutes. For standard dry cracks, a slower 24-hour cure time allows the product to bond more securely to the concrete pores.
- Weather and Temperature Resistance: Most concrete fillers require application temperatures between 40°F and 85°F. If you are repairing an exterior crack in the dead of winter or during a humid summer, make sure your chosen product is rated for those extremes.
For specialized advice on smaller cosmetic issues, consult our small foundation crack repair guide and our tips on sealing small cracks in foundation, or look into a dedicated concrete wall crack sealer for quick, non-structural touch-ups.
Interior DIY Repairs vs. Exterior Foundation Waterproofing
When a foundation crack leaks, your first instinct is probably to patch it from the inside. It is warmer, drier, and far less labor-intensive. But is an interior repair always the best choice?
- Interior DIY Repair: Injecting a crack from the inside with polyurethane or epoxy is highly effective for poured concrete walls. It is affordable, requires no excavation, and can be completed in an afternoon.
- Exterior Excavation & Waterproofing: If you have a block foundation, or if a crack is structurally compromised and letting in massive amounts of water, sealing it from the inside is often a temporary band-aid. True exterior waterproofing requires digging down to the footing, cleaning the exterior wall, applying an elastomeric waterproofing membrane, and installing proper French drains.
Additionally, managing water outside your home is your first line of defense. Ensure your gutters are clean, your downspouts extend at least 10 feet away from your foundation, and your yard’s soil grading slopes away from your home.
If you are dealing with outdoor concrete issues, read our guides on handling exterior foundation cracks, fixing exterior foundation cracks, and our step-by-step instructions on how to seal exterior foundation cracks.
Top-Rated Foundation Crack Fillers Reviewed
Let’s look at the real-world performance, pros, and cons of the most popular foundation crack fillers on the market today.

1. uPLUG Concrete Crack Repair Kit
- Type: Expanding Polyurethane Foam Injection Kit
- Best For: Leaking poured concrete basement walls (up to 10 linear feet)
- Pros: Expands up to 20x its volume to fill deep voids; remains permanently flexible; no drilling or digging required; includes a fast-curing (30-45 min) surface seal.
- Cons: Not suitable for hollow cinder block walls; must be applied within a 40°F to 85°F temperature window.
- Performance: Excellent user feedback for permanently stopping active seepage and blocking radon gas.
2. RadonSeal DIY Foundation Crack Repair Kit
- Type: Dual Epoxy & Polyurethane Foam Kit
- Best For: Comprehensive vertical crack repair and radon mitigation
- Pros: Combines the structural strength of epoxy with the water-stopping power of expanding foam; cures in about 4 hours; handles cracks up to 1/2 inch wide.
- Cons: Slightly higher price point; requires careful mixing of two-part components.
- Performance: Highly rated by DIYers looking for professional-grade results to pass home inspections. You can view their options directly on the RadonSeal: Concrete Crack Repair Kits store page.
3. Sikadur Crack Fix
- Type: Low-Viscosity, High-Strength Epoxy Sealing System
- Best For: Structural repair of thin, dry cracks
- Pros: Five times stronger than concrete; conforms to ASTM C-881 standards; self-mixing cartridge eliminates mess.
- Cons: Very low viscosity means it can run out of the back of the crack if not sealed properly; not flexible.
- Performance: The industry standard for structural bonding of concrete cracks. Learn more on the Sikadur Crack Fix is a low-viscosity, high-strength epoxy sealing system product page.
4. Sikaflex Self-Leveling Sealant
- Type: Polyurethane Horizontal Joint Sealant
- Best For: Basement floors, driveways, and garage floors
- Pros: Extremely easy to apply; self-levels beautifully with no tooling required; highly flexible; paintable.
- Cons: Long cure time (3 to 5 days); cannot be used on vertical surfaces.
- Performance: Consistently voted the best overall horizontal concrete crack filler by experts and homeowners alike.
5. Sashco Slab Concrete Crack Filler
- Type: Flexible Acrylic Latex Sealant
- Best For: Wide horizontal cracks and joints (up to 3 inches wide)
- Pros: Stretches up to three times the crack width; textured to blend in with real concrete; easy water cleanup.
- Cons: Not suitable for structural vertical foundation walls; can shrink slightly during curing.
- Performance: Ideal for heavy-traffic driveways and patios experiencing thermal shifting.
6. GCF Polyurethane Crack Filler (1-Gallon Bulk Kit)
- Type: Fast-Setting Industrial Polyurethane
- Best For: Large-scale commercial or residential repairs
- Pros: Ultra-low viscosity (<30 cps) for deep penetration; rapid cure time (walkable in 15-20 minutes); massive bond strength (up to 9,000 psi with sand).
- Cons: Extremely short pot life (1-3 minutes); requires rapid application.
- Performance: A contractor-grade bulk option. Check out the GCF Polyurethane Crack Filler – 1-Gallon Bulk Concrete Repair Kit for major projects.
For more generalized options, we have also compiled reviews of everyday retail products in our basement crack sealer guide and our comprehensive basement wall crack repair guide.
What is Included in a Professional-Grade 10-Ft DIY Injection Kit?
If you decide to buy a complete 10-foot DIY foundation crack repair kit, you can typically expect to pay between $120 and $160. A comprehensive kit should include:
- 2 Cartridges of Expanding Polyurethane Foam (or low-viscosity epoxy)
- 2 Tubes of Surface Paste/Port Adhesive (usually a fast-setting epoxy or polyurea)
- 10 to 15 Surface Injection Ports with caps
- Static Mixing Nozzles and slip-on injection hoses
- Nitrile Gloves, Safety Glasses, and Wooden Mixing Sticks
- Wire Brush for surface preparation
Buying a complete kit ensures you have chemically compatible products that won’t fail during the application process. If you want to master this technique, check out our guide on mastering epoxy injection.
Step-by-Step Guide to Injecting a Foundation Crack
Ready to tackle that leaking vertical crack? Follow this step-by-step injection guide to get a professional, watertight seal.
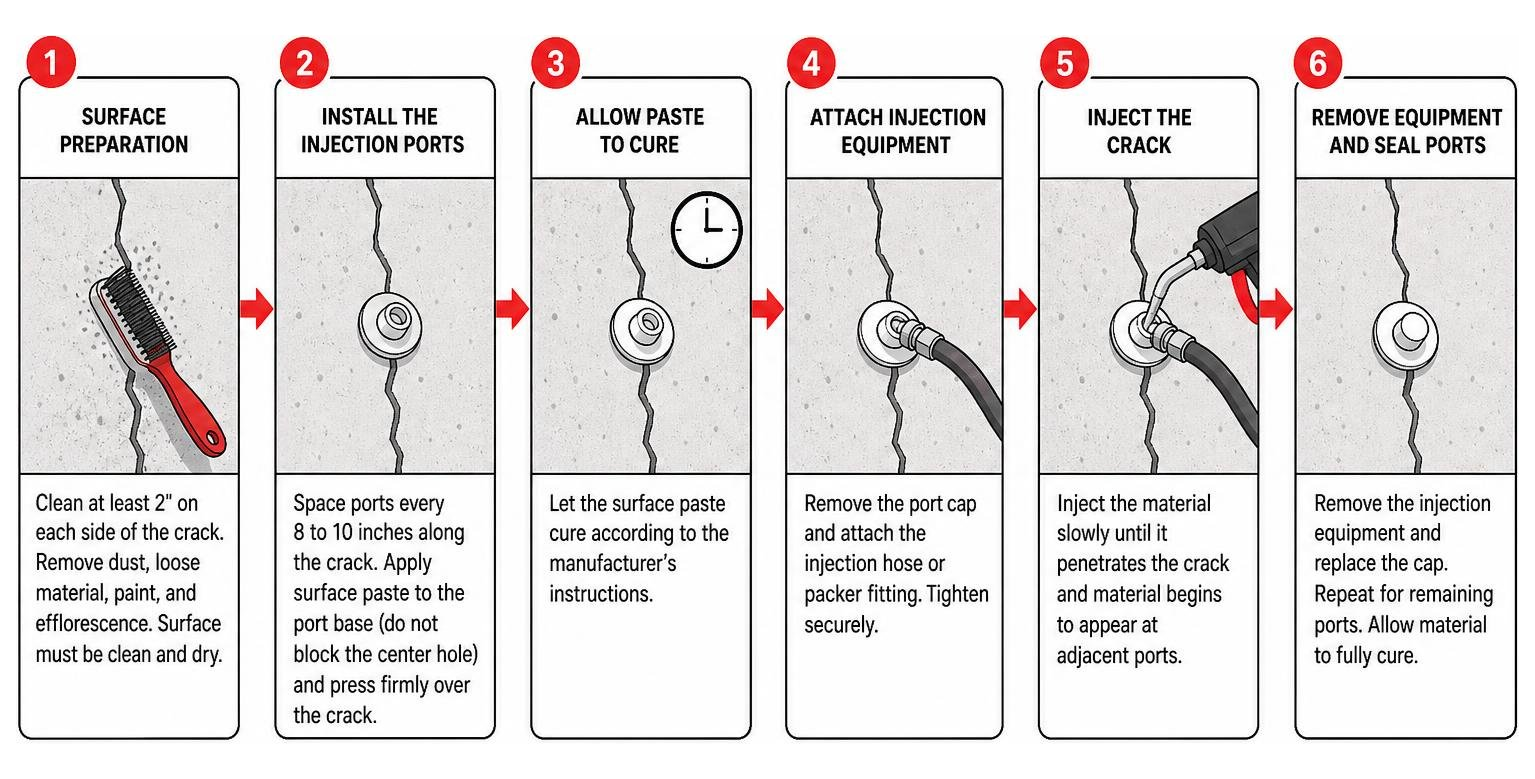
Step 1: Surface Preparation
The most common cause of failed crack repairs is poor preparation. Clean the concrete surface at least 2 inches on both sides of the crack using a wire brush. Remove all loose dust, efflorescence, paint, and dirt. The concrete must be clean and dry for the surface paste to adhere properly.
Step 2: Install the Injection Ports
Space your surface injection ports every 8 to 10 inches along the crack, starting from the bottom and working your way up. Apply a small amount of the fast-setting surface paste to the flat base of the port (being careful not to plug the center hole), and press it firmly against the wall over the crack.
Step 3: Seal the Surface
Mix the remaining surface paste and apply a generous layer (about 1/8 inch thick and 2 inches wide) along the entire length of the crack between the ports. This creates a containment barrier, ensuring that when you inject the expanding foam, it stays inside the wall rather than leaking out into your basement. Let this paste cure completely (usually 30 to 45 minutes).
Step 4: Inject the Foam
Attach your mixing nozzle to the expanding polyurethane cartridge and insert it into a standard caulk gun. Start injecting at the very bottom port. Squeeze slowly and steadily.
Keep injecting until you see the liquid foam begin to seep out of the next port up. Cap the bottom port, move your nozzle to the next port, and repeat the process all the way to the top of the wall.
Step 5: Clean Up and Port Removal
Allow the polyurethane foam to expand and cure for at least 4 to 12 hours. Once fully cured, you can strike the injection ports with a hammer to snap them off the wall. If desired, scrape away the excess surface paste for a smooth, clean finish.
If you are dealing with a crack that is actively dripping water while you attempt this, read our specialized advice on how to handle a crack in basement wall leaking water.
Common Mistakes to Avoid During DIY Crack Repair
- Injecting onto Wet Surfaces: While polyurethane needs moisture to react and expand, the surface paste used to glue the ports and seal the crack must be applied to dry concrete, or it will peel off under pressure.
- Rushing the Cure Times: Trying to inject foam before the surface paste has fully cured will blow the ports right off the wall, creating a massive, sticky mess.
- Ignoring Structural Movement: If your crack is horizontal or continually widening, injecting it without addressing the structural cause is a waste of time. The shifting wall will simply break the new seal.
If you are unsure whether your crack is safe for a DIY fix, it is always best to search for professional foundation crack repair near me to get an expert opinion.
Frequently Asked Questions About Foundation Crack Repair
Can I repair a structural foundation crack myself?
We do not recommend DIY repairs for structural cracks (such as horizontal cracks, bowing walls, or diagonal cracks wider than 1/4 inch). These issues point to severe soil pressure or settling footings that require heavy carbon-fiber reinforcement, steel beams, or underpinning. Attempting a cosmetic DIY fix can lead to catastrophic wall failure.
How long do DIY foundation crack repairs last?
A properly executed polyurethane foam injection can easily last 15 to 20 years or more. Because the foam remains flexible, it moves with the seasonal shifting of your home. Rigid repairs, like hydraulic cement or cheap hardware-store caulks, often fail within 1 to 2 years.
What is the difference between epoxy and polyurethane injection?
- Epoxy is incredibly strong (stronger than concrete) and is designed to structurally weld a cracked wall back together. It must be applied to dry cracks.
- Polyurethane is flexible and expands rapidly when it hits water. It is the absolute best choice for stopping active water leaks and sealing non-structural cracks.
Conclusion
Finding the best foundation crack filler is all about matching the right product chemistry to your specific crack type. While horizontal, structural, or wide cracks require professional intervention, a high-quality DIY polyurethane injection kit is an incredibly effective, budget-friendly way to stop vertical basement leaks in their tracks.
However, if you are located in the Philadelphia area, South Jersey, or Delaware, and you want the peace of mind that comes with a permanent, guaranteed fix, we are here to help. At Basement Waterproofing Scientists, we have 30 years of experience protecting homes.
Our secret weapon? We use highly specialized diagnostic equipment to pinpoint the exact source of your basement leaks. By finding the precise path of the water, we can fix your leaks for less — avoiding unnecessary work and saving you thousands of dollars compared to traditional waterproofing contractors. Best of all, our work is backed by a lifetime guarantee.
Don’t let a small crack turn into an expensive headache. Explore our professional foundation crack injection services or learn more about our advanced Foundation Sealant Solutions. Contact us today to schedule your expert inspection!