Why Proper Yard Drainage Can Save Your Home
Learning how to install drain tile in yard is a DIY solution that can transform your soggy outdoor space into a dry, healthy lawn while protecting your home’s foundation from water damage.
Quick Installation Overview:
- Plan and mark – Identify water flow and choose an outlet location.
- Dig trench – 18-24 inches deep, 9-12 inches wide, with a 1% downhill slope.
- Install materials – Line with fabric, add a gravel base, and place the perforated pipe.
- Backfill and restore – Cover with gravel, fold the fabric, and add topsoil and sod.
Many homeowners face the frustration of waterlogged yards. Standing water creates more than an eyesore; it can lead to foundation damage, basement flooding, and unhealthy growing conditions for your lawn. The hydrostatic pressure from saturated soil pushes against foundation walls, potentially causing costly structural problems.
A properly installed drain tile system acts as an underground gutter, collecting excess groundwater through perforated pipes and channeling it away to a safe outlet. This gravity-fed system uses simple physics to solve complex drainage problems, typically costing between $200-$400 for materials on a DIY basis.
I’m Darin Garvey, and with over 30 years of experience in basement waterproofing and drainage, I’ve helped countless homeowners learn how to install drain tile in yard applications. My team at Basement Waterproofing Scientists has seen how proper yard drainage prevents the foundation issues that lead to expensive waterproofing projects later.

Understanding Drain Tile: The What, Why, and Where
Before digging, it’s important to understand the science behind a dry yard. Yard drainage is about managing groundwater, preventing soil saturation, and relieving the hydrostatic pressure that builds up against your home’s foundation.
When waterlogged, the backfill soil around your foundation acts like a sponge, creating a “clay bowl effect.” This pressure forces water to seek the path of least resistance, which is often into your basement. A drain tile system intercepts this water and diverts it away from your foundation. For issues closer to your home, our guide on Drainage Tiles Around House offers targeted solutions.
Proper project planning is the key to success.
What is Drain Tile and How Does It Work?
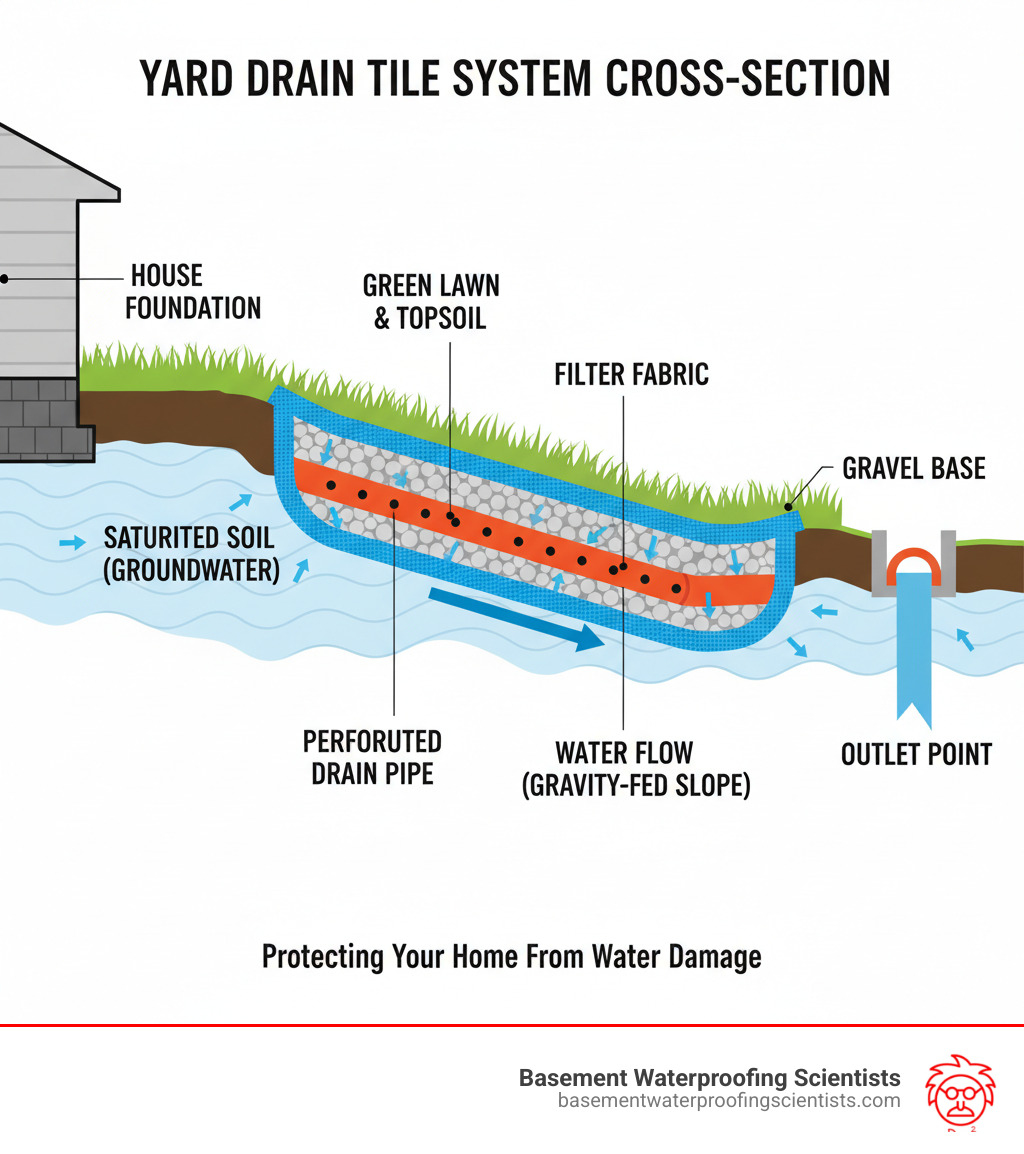
Despite the name, modern drain tile isn’t tile; it’s a system of perforated PVC or corrugated plastic pipes. These pipes are laid in a trench, surrounded by gravel, and wrapped in filter fabric.
Water in the soil is drawn toward this gravel-filled trench, enters the pipe through the perforations, and flows away via gravity. The pipe is installed with a gentle slope, channeling the collected water to a safe outlet. It’s a simple gravity-fed system for water collection and redirection.
The key components are the perforated pipe (collects water), gravel (provides void space and filtration), and filter fabric (keeps soil out). For more technical details, see our Tile Drain System guide.
Benefits of a Yard Drainage System
- Prevents soggy lawns and eliminates puddles: Your yard becomes usable again, even after rain.
- Protects your foundation: Reduces hydrostatic pressure, preventing water intrusion and costly foundation damage.
- Reduces soil erosion: Manages water flow to keep your valuable topsoil in place.
- Improves plant and grass health: Well-drained soil allows roots to get the oxygen they need to thrive.
- Creates usable outdoor space: Expands your living area for family activities without muddy patches.
Planning Your Drain Tile Location and Outlet
Success starts with thinking like water. Where does it come from and where does it want to go?
Identify low spots and map water flow by observing your yard during and after rain. Note where water collects and which direction it flows. This reveals your problem areas and the logical path for your drain.
Choose your outlet carefully. Options include daylighting to a street or ditch if you have a clear downhill path, a dry well to disperse water underground, or a storm drain connection (which may require permits).
Call 811 before digging. This is a critical step. A few days before you start, contact your local utility locate service to mark underground lines, preventing dangerous and costly accidents.
A downhill slope is absolutely critical. The system is gravity-fed and requires a continuous downhill slope. Aim for at least a 1% grade, which is a 1-inch drop for every 10 feet of pipe.
Gearing Up: Tools and Materials for Your Project
Having the right tools and materials makes learning how to install drain tile in yard a smooth project. This is a budget-friendly DIY, with most homeowners spending between $200-$400 on materials. In comparison, professional installation can run $20 to $60 per linear foot. For a deeper dive into pricing, check out our Drain Tile Installation Cost guide.
Essential Tools for Drain Tile Installation
You likely own some of these, and the rest can be rented.
- Shovel: A sturdy digging shovel for excavation.
- Trenching Shovel: A narrow blade for cleaning the trench bottom.
- Wheelbarrow: Essential for moving dirt and gravel.
- Tape Measure, Stakes, and String: For marking your trench path.
- Line Level: To ensure the crucial 1% slope.
- Work Gloves, Safety Glasses, and Ear Protection: For your safety.
For larger projects, consider renting equipment. A walk-behind trencher (around $50/day) saves hours of work. For rocky terrain, some DIYers rent a backhoe.
Materials You’ll Need to Purchase
Each component plays a specific role in your system’s success.
- Perforated Drain Pipe: 4-inch diameter is standard. Flexible corrugated pipe is easier for curves, while rigid PVC pipe offers better durability and flow.
- Non-Woven Geotextile Filter Fabric: A critical component that lines the trench to prevent soil and silt from clogging your system.
- Washed Drainage Gravel: Use 3/4-inch crushed rock or pea gravel. The “washed” aspect is important, as it removes fine particles that can cause clogs.
- Pipe Fittings: Couplers and Y-fittings to connect sections and create branches.
- Inlet Grate or Catch Basin: Optional, but useful for capturing large volumes of surface water quickly.
- Outlet Emitter: A pop-up emitter or rock bed at the discharge point to prevent erosion.
The Complete Guide on How to Install Drain Tile in Your Yard
This step-by-step process requires patience and precision. Before starting, wear your work gloves and safety glasses, and double-check the utility markings from your 811 call. Rushing the preparation can lead to a system that doesn’t work. For complementary techniques, see our French Drain Installation guide.
Step 1: Digging the Trench with the Proper Depth and Slope
Getting the trench dimensions and slope right is critical.

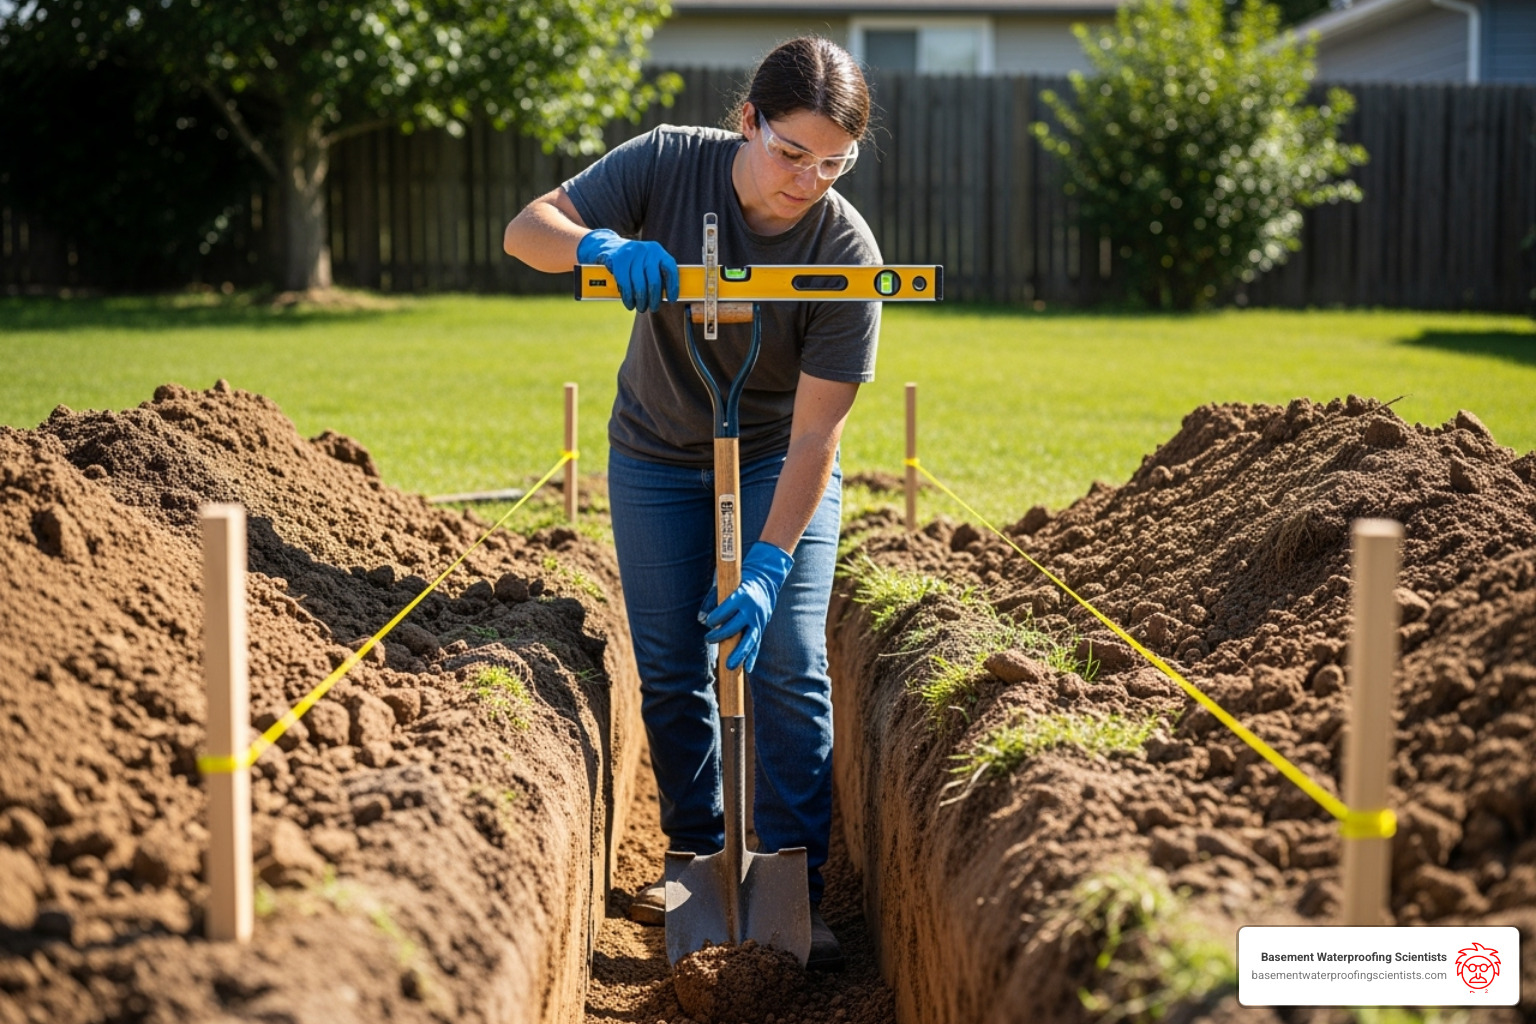
First, mark your path with stakes and string. Dig the trench 18-24 inches deep and 9-12 inches wide. For severe drainage problems near foundations, you may need to go deeper.
Next, establish the proper slope. Your system needs a continuous 1% grade (1 inch of drop for every 10 feet). To set this, drive stakes at both ends of the trench and tie a string between them. Use a line level to make it horizontal. Then, at the outlet end, lower the string by your calculated total drop (e.g., 5 inches for a 50-foot run). This string is now your sloped guide.
Renting a trencher can save your back and speed up the process, especially for long trenches. If the soil is wet, start digging from the downhill end and work uphill to allow water to drain out as you work.
Step 2: Lining the Trench and Adding a Gravel Base
This step ensures the long-term success of your system.

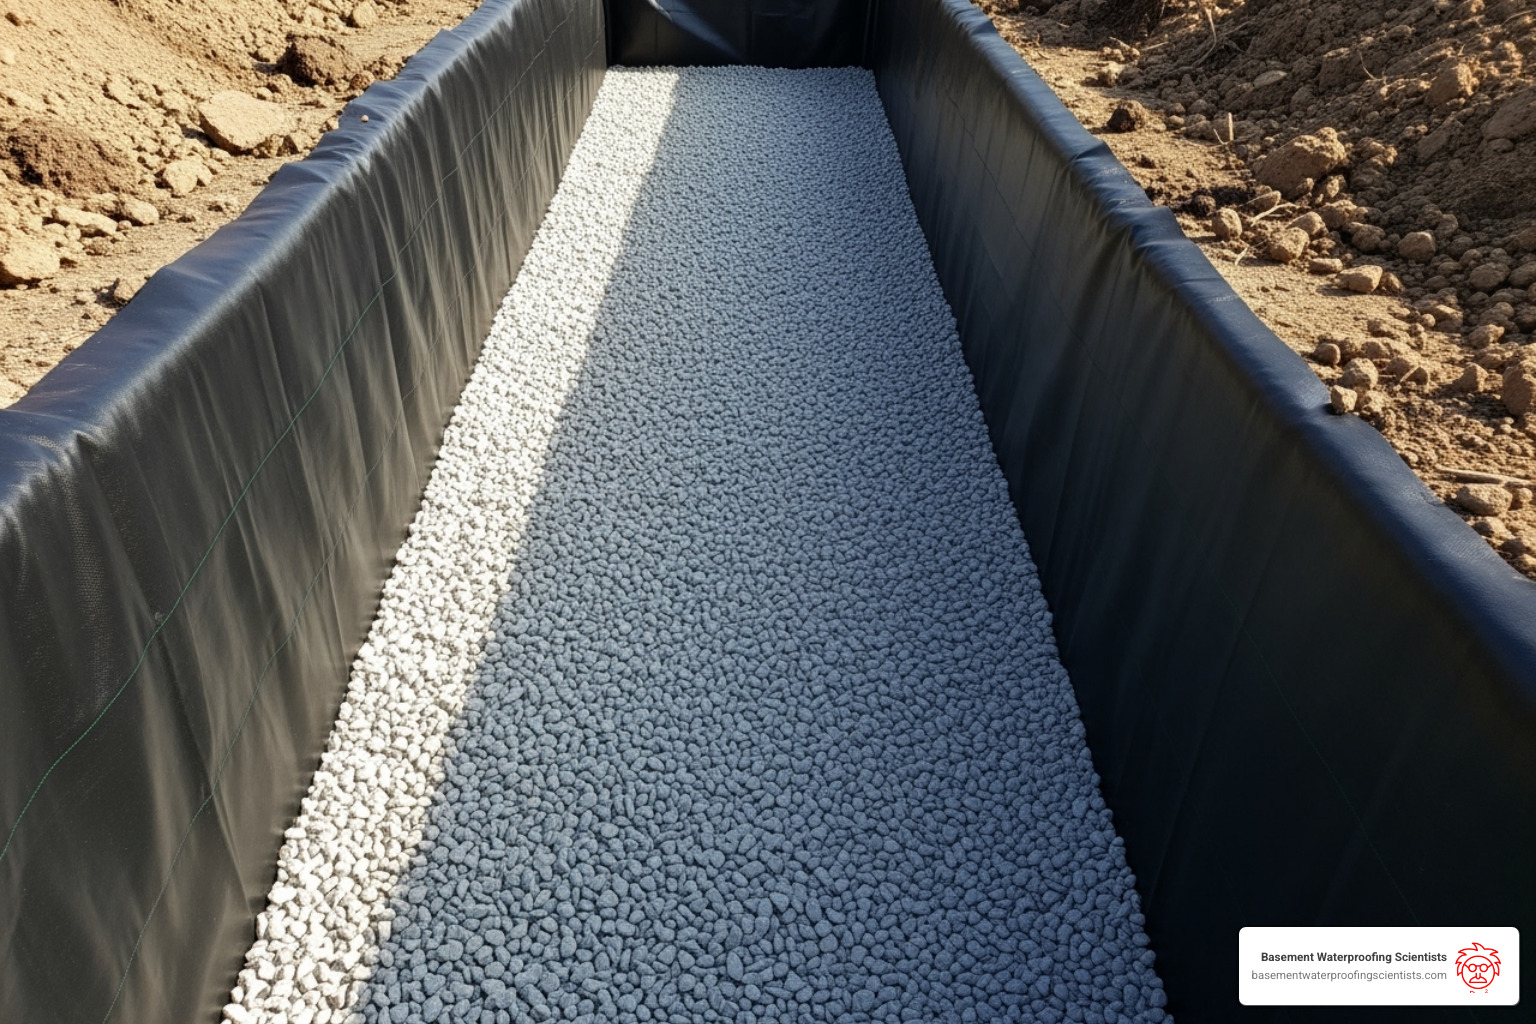
Unroll your non-woven geotextile filter fabric and line the entire trench, leaving plenty of excess fabric on the sides to fold over later. This fabric is your insurance against clogs from soil, silt, and roots.
Next, add a 2-3 inch base of washed drainage gravel. This creates a stable, level foundation for your pipe and allows water to flow freely underneath. Confirm this base maintains your planned slope.
Step 3: A guide on how to install drain tile in your yard pipework
Now, install the pipe that will carry water away.
Place your perforated drain pipe on the sloped gravel base. For yard drainage, position the pipe with perforations facing down at the 4 and 8 o’clock positions. This allows water to enter from below and the sides while preventing silt from settling in the holes.
Double-check your slope with a line level on top of the pipe. This is your last chance for easy adjustments. Use appropriate couplers or solvent cement to connect pipe sections, and use Y-fittings for branches to maintain smooth flow. Finally, cap the uphill end of your system to keep out debris. If connecting to a Basement Drainage Channel, ensure the connection is robust and sealed.
Step 4: Backfilling the Trench and Restoring Your Yard
This final step transforms your project back into a beautiful yard.

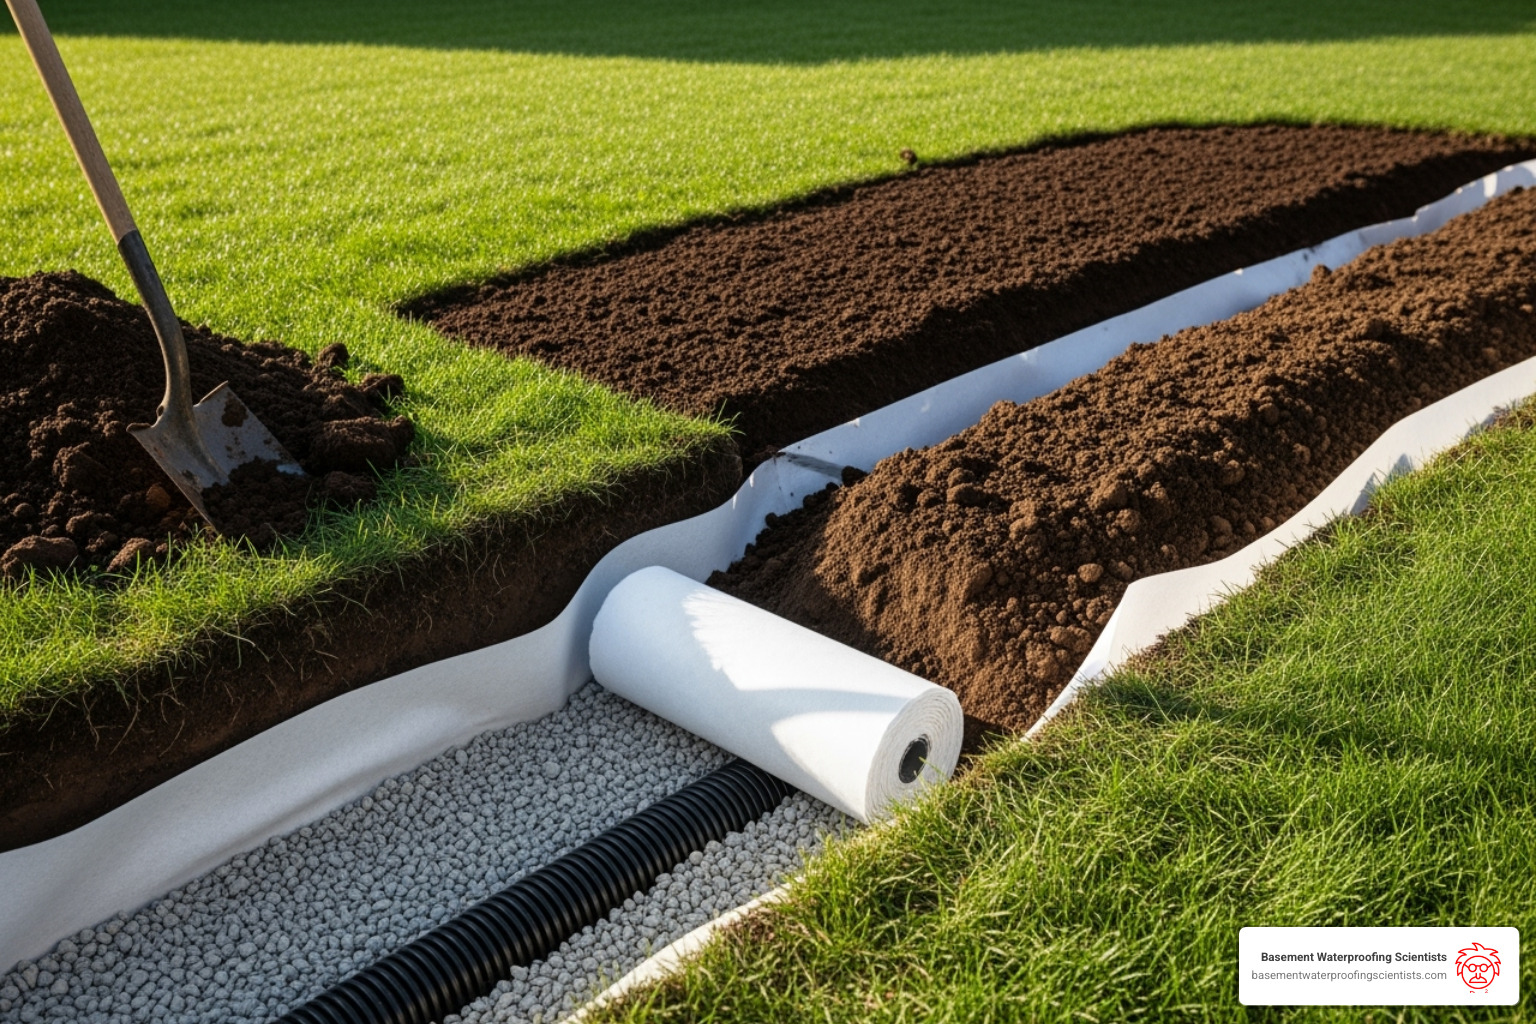
Cover your pipe with gravel until it is completely encased, with at least 12 inches of total drain rock covering the pipe. This creates the necessary void space for water collection.
Next, fold the excess filter fabric over the gravel, overlapping the edges to create a “gravel burrito.” This enclosure keeps soil out of your system.
Backfill with your excavated topsoil, leaving the surface slightly mounded to account for settling. Finally, replace your sod or reseed the area. At the discharge point, create a small rock bed to prevent erosion.
Advanced Considerations and Troubleshooting
Even the best-planned projects can hit snags. Understanding common challenges and proper maintenance will keep your system working for decades. For additional background, What To Know About Drain Tile offers valuable insights.
Common Challenges and How to Solve Them
- Hitting large rocks or roots: If you hit a boulder, try digging around it or using a pry bar. If it’s immovable, slightly adjust your trench path. You can cut smaller tree roots, but try to keep drains at least 50 feet from large trees.
- Trench wall collapse: This happens in loose or wet soil. Widen the top of your trench into a V-shape for stability. If the soil is very unstable, let it dry for a day before continuing.
- Managing excess excavated dirt: A 100-foot trench produces a lot of soil. Use the excess to fill low spots in your yard or create raised garden beds.
- Clogs: If your system clogs, signs include reduced outlet flow or water pooling. Our guide on Cleaning Out Weeping Tiles covers solutions for blockages.
Drain Tile Maintenance and Long-Term Care
A properly installed system is low-maintenance. A little attention twice a year keeps it flowing.
- Inspect your outlet in the spring and fall. Clear any leaves, grass, or debris blocking the opening.
- Clear debris from grates after storms to prevent backups.
- Watch for signs of trouble like returning standing water or wet spots along the trench line.
- Flush your system annually by running a garden hose into the highest inlet for several minutes to clear minor debris.
When to Hire a Professional for Your Yard Drainage Project
While how to install drain tile in yard is a great DIY project, some situations require professional expertise.
- High water table conditions: If groundwater is consistently near the surface, you may need a more advanced system with sump pumps designed by a professional.
- Complex grading and steep slopes: Professionals use laser levels to ensure the critical 1% slope on uneven terrain.
- Connecting to municipal drains: This almost always requires permits and professional oversight to comply with local codes.
- Lack of time or equipment: Digging is hard work. Sometimes paying for professional installation is the more practical choice.
For complex jobs requiring expert analysis, especially when yard drainage ties into foundation issues, specialized help is invaluable. At Basement Waterproofing Scientists, we use specialized equipment to identify exact leak sources and design permanent solutions. With 30 years of experience, we serve Pennsylvania, New Jersey, and Delaware with expert inspections and customized drainage solutions backed by our lifetime guarantee. Investing in professional yard drainage now can prevent much larger expenses later.
Frequently Asked Questions about Yard Drain Tile Installation
What’s the difference between drain tile and a French drain?
The terms are often used interchangeably. “Drain tile” is the general term for any perforated pipe system that redirects groundwater. A “French drain” is a specific type of drain tile system, consisting of a perforated pipe in a gravel-filled trench. When you learn how to install drain tile in yard applications, you are essentially installing a French drain.
How do I know if I need drain tile in my yard?
Your yard will show clear signs when it needs help. Look for these red flags:
- Standing water that lingers for more than 24 hours after rain.
- Consistently soggy or spongy turf, even without visible puddles.
- Water pooling near your home’s foundation, which creates hydrostatic pressure and risks basement flooding.
- Bare patches where grass won’t grow due to excessive moisture.
- Erosion patterns where soil is washing away.
Can I install drain tile without gravel?
While some specialized agricultural systems are gravel-free, we strongly recommend using gravel for residential how to install drain tile in yard projects. Gravel is essential for several reasons:
- It creates void space around the pipe for water to collect and flow freely.
- It protects the pipe from being crushed by the weight of the soil above.
- It works with the filter fabric to provide excellent filtration, preventing clogs.
For a DIY installation, skipping the gravel is asking for trouble. The small additional cost of washed gravel pays huge dividends in system longevity and effectiveness. The systems that work reliably for decades are the ones with proper gravel installation.
Conclusion: Enjoy a Drier, Healthier Yard
Congratulations! You now know how to install drain tile in yard applications. You’ve not only solved a soggy yard problem but also protected your home’s foundation from costly water damage. Your new drain tile system will prevent soil saturation, reduce erosion, and create a healthy environment for a lush lawn.
This project proves that with the right knowledge and some hard work, homeowners can tackle meaningful improvements. The $200-$400 invested in materials will pay dividends for years in both enjoyment and protection.
Remember to maintain your system by periodically checking outlets and clearing grates. With proper care, your installation will provide decades of reliable service.
However, if water problems persist or seem connected to deeper foundation issues like cracks or recurring basement moisture, it may be time to look beyond yard drainage. For these complex situations, professional basement drain systems are essential.
At Basement Waterproofing Scientists, we’ve seen how yard drainage connects to total home protection. With 30 years of experience, we use specialized equipment to identify the source of water problems and design permanent solutions. While average basement waterproofing costs between $4K and $8K, it’s a worthwhile investment for complete peace of mind. Your newly drained yard is a great first step in creating a water-free environment for your home.

