

Why Installing a French Drain System is Your Best Defense Against Water Damage
Installing a french drain system is a proven solution for homeowners battling soggy yards, basement flooding, and foundation water damage. A French drain is a gravel-filled trench containing a perforated pipe that redirects water away from your home using gravity—protecting your foundation, preventing mold growth, and keeping your basement dry.
Quick Answer: How to Install a French Drain System
- Plan your path – Identify where water pools and mark a downhill route to a drainage point
- Dig the trench – Create a trench 10-18 inches wide and 18-24 inches deep with a 1% downward slope
- Line with fabric – Cover the trench with water-permeable landscape fabric
- Add gravel and pipe – Place 2-3 inches of gravel, lay perforated pipe (holes down), and cover with more gravel
- Backfill and finish – Wrap excess fabric over gravel and fill with topsoil
Average installation cost: DIY materials under $1,000 or professional installation $20-$100 per linear foot
If you’ve been dealing with water collecting in your yard or noticing damp spots in the basement, you’re not alone. Standing water ruins landscapes, harbors mosquitoes, and—most concerning—can seep into your home’s foundation and flood your basement. Left unchecked, water damage leads to mold growth, wood rot, and structural issues that can cost thousands to repair.
The good news? A properly installed French drain system solves these problems by creating an easy path for water to flow away from your home. Whether you’re facing a soggy lawn after every rainfall or battling a damp basement, this drainage solution works quietly underground to protect your property 24/7.
Should you DIY or hire a pro? That depends on your situation. A shallow exterior drain for yard drainage can be a manageable weekend project for handy homeowners. But foundation work, deep excavation, or interior basement drains often require professional expertise—especially if you’re dealing with complex grading issues or need to connect to existing drainage systems.
In this guide, we’ll walk you through everything you need to know: what a French drain is, how it works, when you need one, and step-by-step instructions for both exterior and interior installations. We’ll also cover costs, maintenance, and when it makes sense to call in the experts.
I’m Darin Garvey from Basement Waterproofing Scientists, and over the past 30 years, I’ve helped hundreds of Philadelphia-area homeowners solve drainage problems by installing a french drain system and other basement waterproofing solutions. This guide draws from real-world experience and proven techniques to help you protect your home from water damage.

Related content about installing a french drain system:
What is a French Drain and Why Do You Need One?
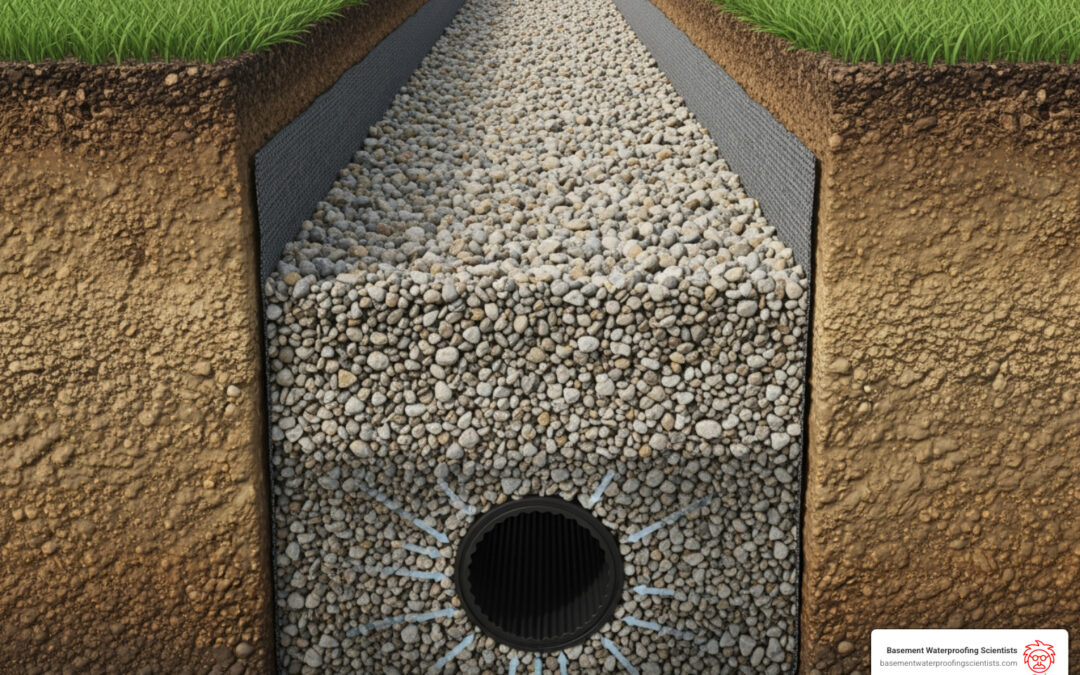
A French drain, sometimes called a trench drain, blind drain, rubble drain, or rock drain, is a simple yet incredibly effective drainage system. At its core, a French drain system is a trench filled with gravel that contains a perforated pipe. Its purpose is to collect excess surface water or groundwater and redirect it away from areas where it can cause problems, such as your home’s foundation or a perpetually soggy yard.
How it Works: The Magic of Gravity and Gravel
The genius of a French drain lies in its simplicity. When water saturates the soil, gravity pulls it downward. Instead of hitting a solid wall and pooling, the water encounters the gravel-filled trench. The gravel provides an easy path for the water to percolate through, where it then enters the perforated pipe through small holes. Once inside the pipe, the water flows downhill, guided by gravity, to a designated discharge point. This could be a storm sewer, a dry well, or simply a lower, safer area of your property.
Benefits of Installing a French Drain
Installing a french drain system offers a multitude of benefits that extend far beyond just drying up a puddle:
- Foundation Protection: By diverting water away from your foundation, a French drain significantly reduces hydrostatic pressure. This is the pressure of groundwater pushing against your basement walls, which can lead to cracks, leaks, and even structural damage over time. Protecting your foundation is paramount to your home’s long-term health.
- Prevents Soil Erosion: Excess runoff can wash away valuable topsoil, damage landscaping, and create unsightly trenches in your yard. A French drain controls this flow, preventing erosion and maintaining the integrity of your property.
- Mold prevention: A damp basement is a breeding ground for mold and mildew, which can pose serious health risks and cause unpleasant odors. By keeping your basement dry, a French drain contributes to a healthier indoor environment.
- Reduces Standing Water: Say goodbye to mosquito breeding grounds and muddy footprints! A French drain eliminates standing water in your yard, making your outdoor spaces more enjoyable and usable.
Common Drainage Issues French Drains Can Resolve
French drains are incredibly versatile and can tackle a range of common water problems:
- Soggy Lawns and Waterlogged Gardens: If your yard turns into a swamp after every rain, a French drain can transform it into a usable green space.
- Standing Water Near Foundations: This is a major red flag for potential basement issues. A French drain intercepts this water before it can infiltrate your home.
- Wet basement repair: If you’re experiencing leaks, dampness, or even minor flooding in your basement, an interior French drain system is often the most effective solution.
Signs You Need a French Drain
How do you know if a French drain is right for your home? Look for these tell-tale signs:
- Musty Smells: A persistent musty odor in your basement or crawl space indicates excess moisture.
- Efflorescence: White, powdery mineral deposits on your basement walls are a sign that water is seeping through and leaving behind salts.
- Water Stains or Cracks: Any visible water stains, discoloration, or cracks on your basement walls or floor are clear indicators of water intrusion.
- Pooling Water: If you notice water pooling in your yard, especially near your home’s foundation, after rainfall, it’s time to consider drainage solutions.
- Damp or Soggy Soil: Even without visible pooling, consistently damp or squishy soil can indicate poor drainage.
Planning and Preparation for Your Project
Before you grab a shovel, careful planning and preparation are crucial for a successful French drain installation. Think of it as mapping out your water’s escape route!

Assessing Your Property
Start by playing detective during and after a heavy rain. Observe where water naturally flows, where it collects, and where the lowest points on your property are.
- Identifying Low Spots: These are your problem areas and the starting point for your drain.
- Choosing an Outlet Point: This is where the collected water will ultimately go. Ideally, you’ll have a “daylight outlet” where the pipe can simply discharge water onto a lower part of your property, away from any structures or neighboring properties. If not, you might need a dry well or connection to a storm sewer (check local regulations!).
Soil Type Considerations
The type of soil you have can impact your drain’s performance:
- Clay Soil: Common in many parts of Pennsylvania, New Jersey, and Delaware, clay soil retains water and drains very slowly. This means water can build up more easily, making a French drain even more critical. You may need a longer drain or additional drainage solutions to compensate for slow percolation.
- Sandy Soil: While sandy soil drains better, a French drain can still be beneficial to quickly channel away large volumes of water, preventing saturation near foundations.
Choosing the Right Type: Interior vs. Exterior
When considering installing a french drain system, it’s important to understand the two main types:
- Exterior Drains: These are installed around the outside perimeter of your home’s foundation or in specific areas of your yard where water collects. They are ideal for:
- Yard drainage: To dry out soggy lawns and gardens.
- Foundation perimeter: To intercept groundwater before it reaches your basement walls.
- New construction: Often installed as part of the initial building process.
- Interior Drains: Sometimes called a perimeter drain or drain tile, these systems are installed inside your basement along the perimeter walls. They are typically used when exterior excavation isn’t feasible or sufficient, or when water is already actively entering your basement.
- Existing homes: A common solution for basements with existing water problems.
- French drain in basement: This type of system captures water as it seeps through basement walls or up from the floor, directing it to a sump pump connection for removal.
- Our interior drainage system solutions are specifically designed to be clog-resistant and highly effective, offering a less invasive and often more affordable option than extensive exterior excavation, especially if your basement is already finished.
Permits, Regulations, and Safety
Don’t skip this step – it’s vital for your safety and to avoid legal headaches!
- Check Local Building Codes: Before starting any excavation, contact your local building department in Pennsylvania, New Jersey, or Delaware. Some municipalities have specific regulations regarding drainage systems, especially if you plan to discharge water into a public area or storm sewer.
- Call Before You Dig hotline: This is non-negotiable! Dialing 811 a few days before you plan to dig will get free city services to mark the location of all underground utilities (gas, electric, water, sewer, communication lines). You can also check looking up your state’s requirements for specific guidelines in Pennsylvania, New Jersey, or Delaware. Hitting a utility line is not only dangerous but can also lead to significant fines and repair costs.
- Safety Gear: Always wear gloves, safety glasses, and sturdy work boots when digging and handling materials.
List of Essential Tools and Materials
Having the right equipment makes the job much easier and safer.
Tools:
- Shovel or Trencher: For smaller projects, a good quality trenching shovel might suffice. For longer or deeper trenches, renting a gas-powered trencher ($75-$100/day) or even hiring a professional with a backhoe ($300-$1,500) will save you immense effort.
- Wheelbarrow: Essential for moving excavated dirt and gravel.
- Level: A long level or a builder’s level is crucial for ensuring the correct slope.
- Tape Measure: For accurate trench dimensions and pipe lengths.
- Rake and Tamper: For grading and compacting soil.
- Utility Knife: For cutting landscape fabric.
- Stakes and String: For marking your trench path and checking slope.
Materials:
- Perforated Pipe: Typically 4-inch diameter. You can choose between:
- Corrugated pipe: More flexible and generally less expensive, but can be harder to clean if it clogs.
- Rigid PVC pipe: More expensive but virtually crush-proof and easier to clean with a plumbing snake. Ensure perforations face downwards.
- Washed Drainage Gravel: Coarse, clean gravel (3/4-inch size is common). This allows water to flow freely and prevents fine soil particles from clogging the pipe. Use a Gravel calculator to estimate the amount needed.
- Water-Permeable Landscape Fabric: This is critical! It prevents soil and roots from entering the gravel and pipe, which is the leading cause of French drain failure. Choose a heavy-duty, non-woven fabric.
- Inlet Grate or Catch Basin: If your drain needs to collect surface water, an inlet grate or catch basin will prevent large debris from entering the system.
- End Caps and Connectors: For joining pipe sections and sealing the ends.
How-To Guide: Installing an Exterior French Drain System
This section focuses on installing a french drain system outside your home to tackle yard drainage or foundation issues.

Connecting to Existing Systems
In some cases, you might be able to connect your new French drain to an existing sump pump French drain system or other drainage infrastructure. However, this is where a professional consultation becomes highly recommended. Improper connections can overwhelm existing systems or create new problems. Our experts can assess your current setup and advise on the safest and most effective connection methods.
Step 1: Trench Excavation
This is often the most labor-intensive part of the project, but getting it right is crucial.
- Mark the Path: Use stakes and string to clearly outline the path of your French drain. Observe the natural flow of water and plan a route that gently slopes away from your home.
- Trench Dimensions:
- Width: The trench should be about 10-18 inches wide. A wider trench provides more room for gravel and better water collection.
- Depth: For general yard drainage, a depth of 18-24 inches is usually sufficient. However, when installing a french drain system around a foundation, the trench should be dug much deeper, typically to the depth of the footing (about 6-8 feet deep), and placed at least two feet away from the foundation wall to avoid undermining the structure.
- Slope: This is perhaps the most critical element. The trench must have a consistent downward slope to ensure water flows away by gravity. We recommend a minimum 1% grade, which translates to about 1/8 to 1/4 inch drop per foot of length. For example, for every 10 feet of drainpipe, the trench should drop at least 1 inch. Use your string line and level to carefully check the slope as you dig.
Step 2: Installing the Drainage Components
With the trench dug and sloped correctly, it’s time to build the drain.
- Line the Trench: Lay your water-permeable landscape fabric along the bottom and sides of the trench. Ensure you leave plenty of excess fabric (about 10-12 inches) overlapping the edges on both sides. This excess will be folded over the gravel later.
- Add Gravel Base: Pour 2-3 inches of washed drainage gravel onto the bottom of the fabric-lined trench. This creates a clean, stable base for your pipe.
- Lay the Pipe: Place the perforated pipe directly on the gravel base. If using rigid pipe, ensure the perforations (holes) are facing downwards. This allows water to enter the pipe from below, where it naturally collects. Connect sections of pipe as needed, ensuring a continuous flow path.
Step 3: Backfilling and Finishing
Almost there! Now we’ll secure the system and restore your landscape.
- Cover Pipe with Gravel: Carefully pour more washed drainage gravel over the pipe until it’s covered by at least 3-5 inches of gravel, reaching within about 4-5 inches of the surface.
- Wrap Fabric: Take the excess landscape fabric from both sides of the trench and fold it over the top layer of gravel. This creates a “burrito” effect, completely encasing the gravel and pipe to prevent soil and roots from infiltrating the system and causing clogs.
- Backfill with Topsoil: Fill the remaining 4-5 inches of the trench with the excavated topsoil. Mound it slightly to account for settling.
- Add Sod or Seed: Restore your lawn by laying sod or spreading grass seed over the backfilled soil. If you prefer, you can also top the trench with decorative rocks or other landscaping elements.
Interior French Drains: The Basement Solution
When exterior measures aren’t enough, or if you’re battling active basement leaks, an interior French drain system is often the most effective solution.
Basement Preparation
Installing a french drain system inside your basement is a significant project that requires careful preparation:
- Clear Area: Remove all furniture, stored items, and anything else from the perimeter of your basement walls where the drain will be installed.
- Dust Protection: Lay down plastic sheeting or tarps to protect other areas of your basement from dust, as this process involves cutting concrete.
Cut the Concrete and Excavate Trench
This is where specialized tools come in.
- Cut the Concrete: Using a concrete saw, our teams precisely cut a channel (typically 10-12 inches wide) around the perimeter of your basement floor, right next to the foundation walls.
- Break Up Slab: The cut sections of concrete slab are then carefully broken up and removed.
- Excavate Trench: A trench is dug beneath the floor, usually 12-18 inches deep. This trench typically extends to the depth of the footing. This is where the drain tile for basement will be installed.
Install Drain Tile, Pipe and Gravel
- Place Pipe and Gravel: A perforated drainpipe (drain tile) is laid in the excavated trench, surrounded by clean washed gravel. The gravel helps filter water and allows it to flow freely into the pipe. A specialized filter fabric is often used here as well to prevent fine soil particles from clogging the system.
- Connect to Sump Pump: The interior drain tile system is designed to collect any water that enters your basement and channel it directly to a basement sump pump installation. The sump pump then automatically pumps the water out and away from your home, keeping your basement permanently dry.
Restore the Floor
- Pour New Concrete: Once the drain tile, pipe, and gravel are in place, the trench is covered, and new concrete is poured to seamlessly restore your basement floor. This creates a hidden, yet highly effective, drainage system.
Costs, Maintenance, and Professional Help
Understanding the financial aspects, ongoing care, and when to call in the cavalry are all part of a smart approach to installing a french drain system.
Understanding the Costs of Installing a French Drain System
The cost of a French drain can vary significantly depending on whether you go the DIY route or hire a professional, as well as the complexity and length of the system.
- DIY Costs: For a basic exterior French drain, materials alone can be done for under $1,000 total. This includes pipe, gravel, landscape fabric, and connectors. Don’t forget to factor in tool rental costs for a trencher, which can run $75-$100 per day.
- Professional Costs: Professional installation typically ranges from $20 to $100 per linear foot. The average total cost for a professional French drain project can be around $9,000, especially for more extensive exterior systems or interior basement solutions. This includes labor, materials, equipment, and expertise. For a general idea of costs for interior systems, refer to our drain tile installation cost guide.
Here’s a quick comparison:
| Feature | DIY Installation | Professional Installation |
|---|---|---|
| Pros | Lower upfront material cost, sense of accomplishment | Expertise, efficiency, proper tools, warranty, peace of mind |
| Cons | Labor-intensive, potential for errors, safety risks | Higher upfront cost |
| Cost | Under $1,000 (materials + tool rental) | $20-$100 per linear foot, average $9,000 total |
| Time | Days to weeks, depending on project size and your availability | Usually 1-3 days for most projects |
Maintenance and Troubleshooting
A properly installed French drain is designed to be relatively low maintenance, but some care is needed to ensure its longevity.
- Maintenance Tips:
- Annual Inspection: We recommend inspecting your French drain system annually, ideally in the spring or fall. Check the inlet and outlet points for any debris like leaves, dirt, or mulch that could cause blockages.
- Clean Outlets: Keep the discharge point clear of any obstructions.
- Flush System: If you have access points or a catch basin, you can occasionally flush the system with a garden hose to clear out any minor sediment buildup.
- Signs of Failure:
- Standing Water Returns: If you notice water pooling in the areas the French drain was supposed to protect, it’s a clear sign of an issue.
- Clogged Inlets/Outlets: Visible debris or standing water at these points.
- Slow Drainage: Water takes an unusually long time to disappear after rain.
- Cleaning out weeping tiles: If you have an older system with weeping tiles and notice problems, they may need professional cleaning or replacement.
When to Call a Professional
While some homeowners enjoy the challenge of a DIY project, there are definite instances where calling in the experts is the smarter, safer, and ultimately more cost-effective choice.
- DIY Risks:
- Hitting Utility Lines: As we mentioned, this is a serious hazard.
- Incorrect Slope: An improperly sloped drain won’t work, potentially making your water problem worse.
- Foundation Damage: Improper deep excavation near your home’s foundation can undermine its structural integrity.
- Complexity: If the project involves extensive excavation, working with poor soil conditions (like dense clay), or navigating complex landscape features, it quickly moves beyond the scope of a typical DIYer.
- Complex Projects: If your drainage issues involve your home’s foundation, require deep excavation (6-8 feet), or if you’re unsure about proper grading or local codes, a professional is your best bet. Our teams have the specialized equipment and experience to handle these challenges safely and effectively.
- Alternative Solutions Offered by Professionals: Sometimes, a French drain might not be the complete answer. As Basement Waterproofing Scientists, we offer a range of basement waterproofing solutions including surface drains, dry wells, or even grading improvements. We use specialized equipment to identify leak sources to fix leaks for less, ensuring you get the right solution for your specific problem. Our average cost for basement waterproofing, which often includes drainage systems, is between $4K and $8K.
With 30 years of experience serving homeowners in Pennsylvania (Philadelphia, Reading, Norristown, Pottstown, Bensalem Township, Upper Darby Township, Bristol Township, Middletown Township, Lansdale, Warminster Township, Springfield Township, Haverford Township, Radnor Township, Willow Grove, King of Prussia, Horsham, Exeter Township, Cumru Township, Ardmore, Bryn Mawr, Quakertown, Royersford, Conshohocken, Hatboro, Collegeville), New Jersey, and Delaware, we’ve seen it all. We provide expert inspections and competitive pricing, backed by a lifetime guarantee. When you’re dealing with water, you want a permanent solution, not a temporary fix.
Conclusion: Protect Your Home with a Proper Drainage System
Installing a french drain system is an investment in your home’s health and your peace of mind. It’s a fundamental step in creating a dry basement, maintaining a stable foundation, and ensuring you have a usable, enjoyable yard.
The importance of proper installation cannot be overstated. A well-designed and correctly installed French drain will work silently for years, diverting water away from your most valuable asset. Whether you choose to tackle a simple exterior drain yourself or rely on our expertise for more complex foundation or interior basement solutions, understanding the principles and best practices is key.
At Basement Waterproofing Scientists, we’re dedicated to providing comprehensive and lasting solutions for all your water problems. For a comprehensive solution to your water problems, explore our basement drainage systems and experience the peace of mind that comes with a permanently dry home.