


Your First Line of Defense Against a Wet Basement
A basement perimeter drain channel is an interior waterproofing system installed along the perimeter of your basement walls. It’s crucial for preventing water intrusion because it:
- Collects water: Gathers water seeping through walls and floors.
- Relieves pressure: Reduces hydrostatic pressure against your foundation.
- Redirects water: Channels water safely to a sump pump.
- Prevents damage: Stops flooding, mold, and costly structural issues.
If you’ve ever stepped into your basement only to feel that dreaded squish under your feet, you know exactly how frustrating water intrusion can be. Wet basements aren’t just an annoyance; they bring musty odors, risk mold growth, and can severely damage your home’s foundation. This dampness also lowers your property value and makes your basement unusable.
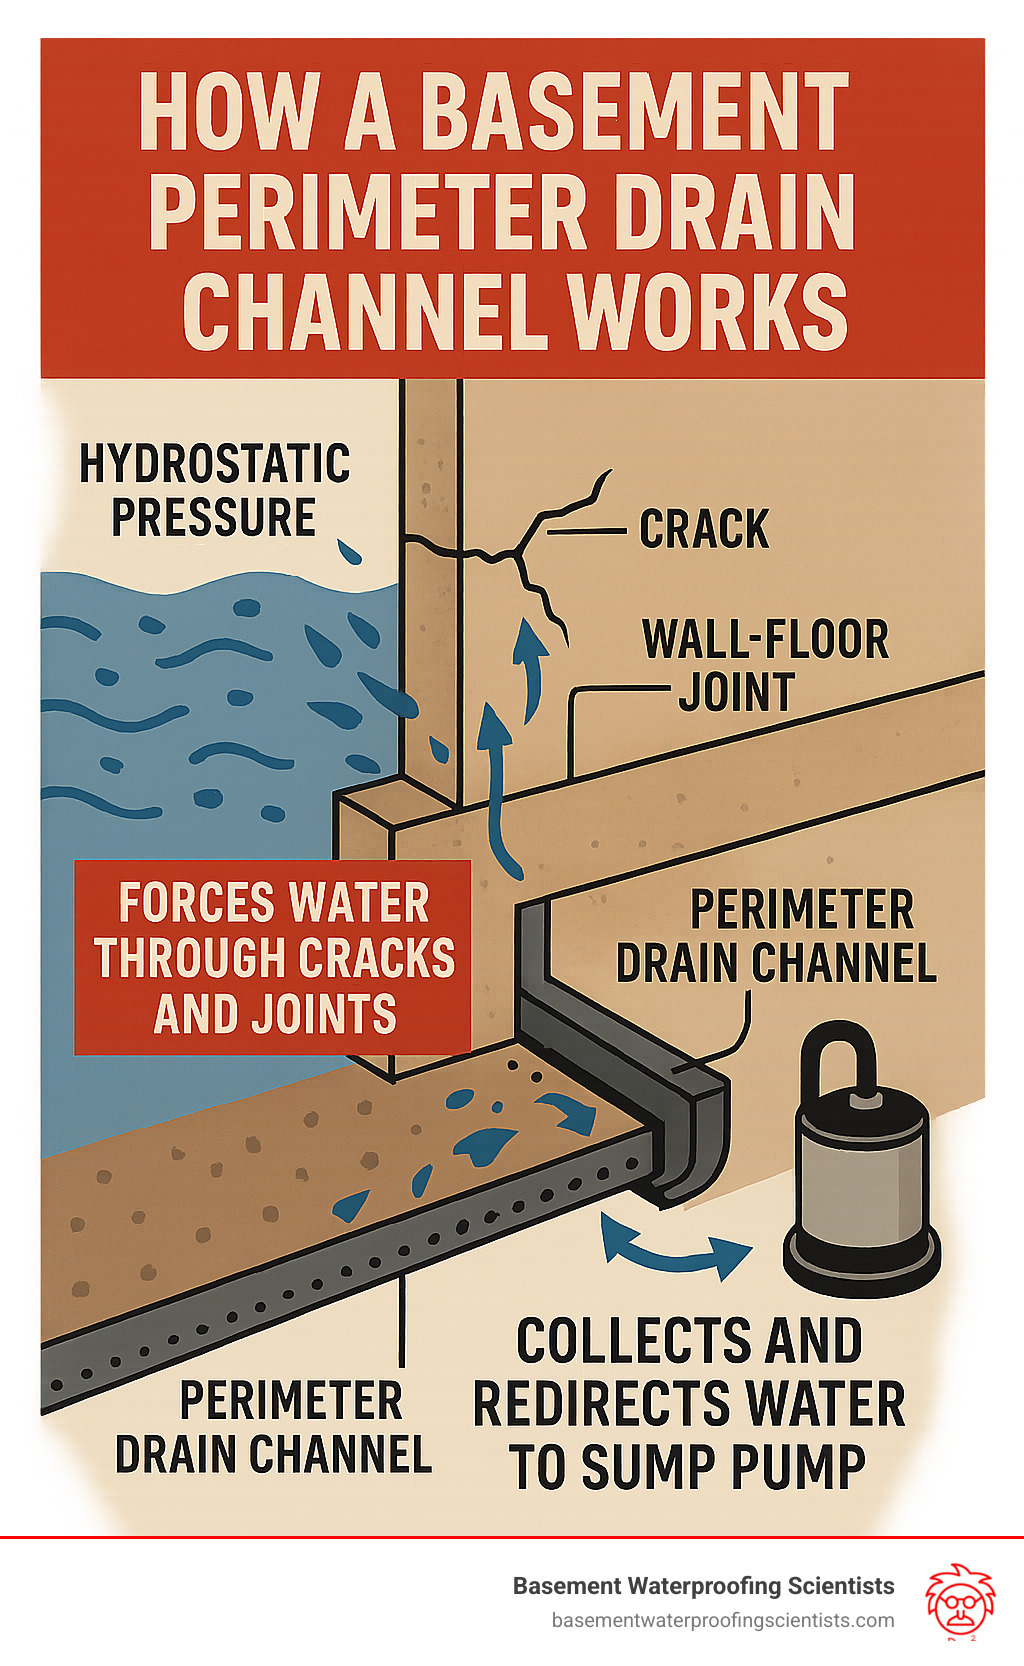
The root cause often lies with hydrostatic pressure. This is groundwater pressing against your basement walls and floor. Over time, it forces its way through cracks and porous concrete. Traditional fixes often fall short, leading to repeated frustration.
That’s where a basement perimeter drain channel comes in. It’s a powerful, permanent solution. This system is designed to intercept water before it ever reaches your living space. A properly installed system typically costs between $4,000 and $8,000, a worthy investment for lasting peace of mind.
As Darin Garvey, I’ve spent over 30 years helping countless homeowners like you protect their properties from water damage. My expertise in strategic leadership and operational oversight at Basement Waterproofing Scientists ensures we deliver state-of-the-art basement perimeter drain channel solutions custom to your home’s unique needs.
Understanding the Science: How a Basement Perimeter Drain Channel Works
Ever wonder why your basement seems to get wet even when there aren’t obvious cracks? Imagine your home sitting in a giant clay bowl. When heavy rains hit, this “clay bowl effect” traps water right around your foundation. As the soil gets soaked, that water starts pushing back against your basement walls and under the floor. This is what we call hydrostatic pressure, and it’s a relentless force, always looking for a way in.
It pushes through the tiniest cracks, through the pores in your concrete, and especially through that tricky spot where your basement floor meets the walls – what we call the “cold joint.” This floor-wall joint is almost always ground zero for water troubles.
That’s where a basement perimeter drain channel becomes your basement’s best friend. Instead of fighting water with temporary patches or coatings that often fail under pressure, we work with physics. This system creates a clever “escape route” for all that persistent groundwater. Think of it as a capillary break, stopping water’s natural journey through your concrete before it ever reaches your living space.
Here’s the simple magic: water that would otherwise seep onto your basement floor is intercepted by the channel. It gently flows into the system through specialized perforations or inlet holes. From there, it’s quietly guided around the perimeter of your basement, far away from your cherished belongings, and straight towards a waiting sump pump system. This continuous collection and redirection of water effectively relieves that stubborn hydrostatic pressure, keeping your basement dry, healthy, and ready for whatever life throws at it. It’s a truly proactive approach that collects water before it can ever make a mess.
We pride ourselves on being like detectives for your basement, using specialized equipment to pinpoint the exact sources of your leaks. This allows us to implement targeted solutions that fix leaks for less, ensuring our basement perimeter drain channel systems are perfectly designed for your home’s unique water challenges. For more insights on how to stop water from seeping through your basement walls, check out our detailed guide: How Do I Stop Water From Seeping Through My Basement Walls?.
Key Components of an Interior Drainage System
A top-notch interior drainage system is a bit like a championship team, with every player doing their part to keep your basement dry. Here are the essential components that make it all work:
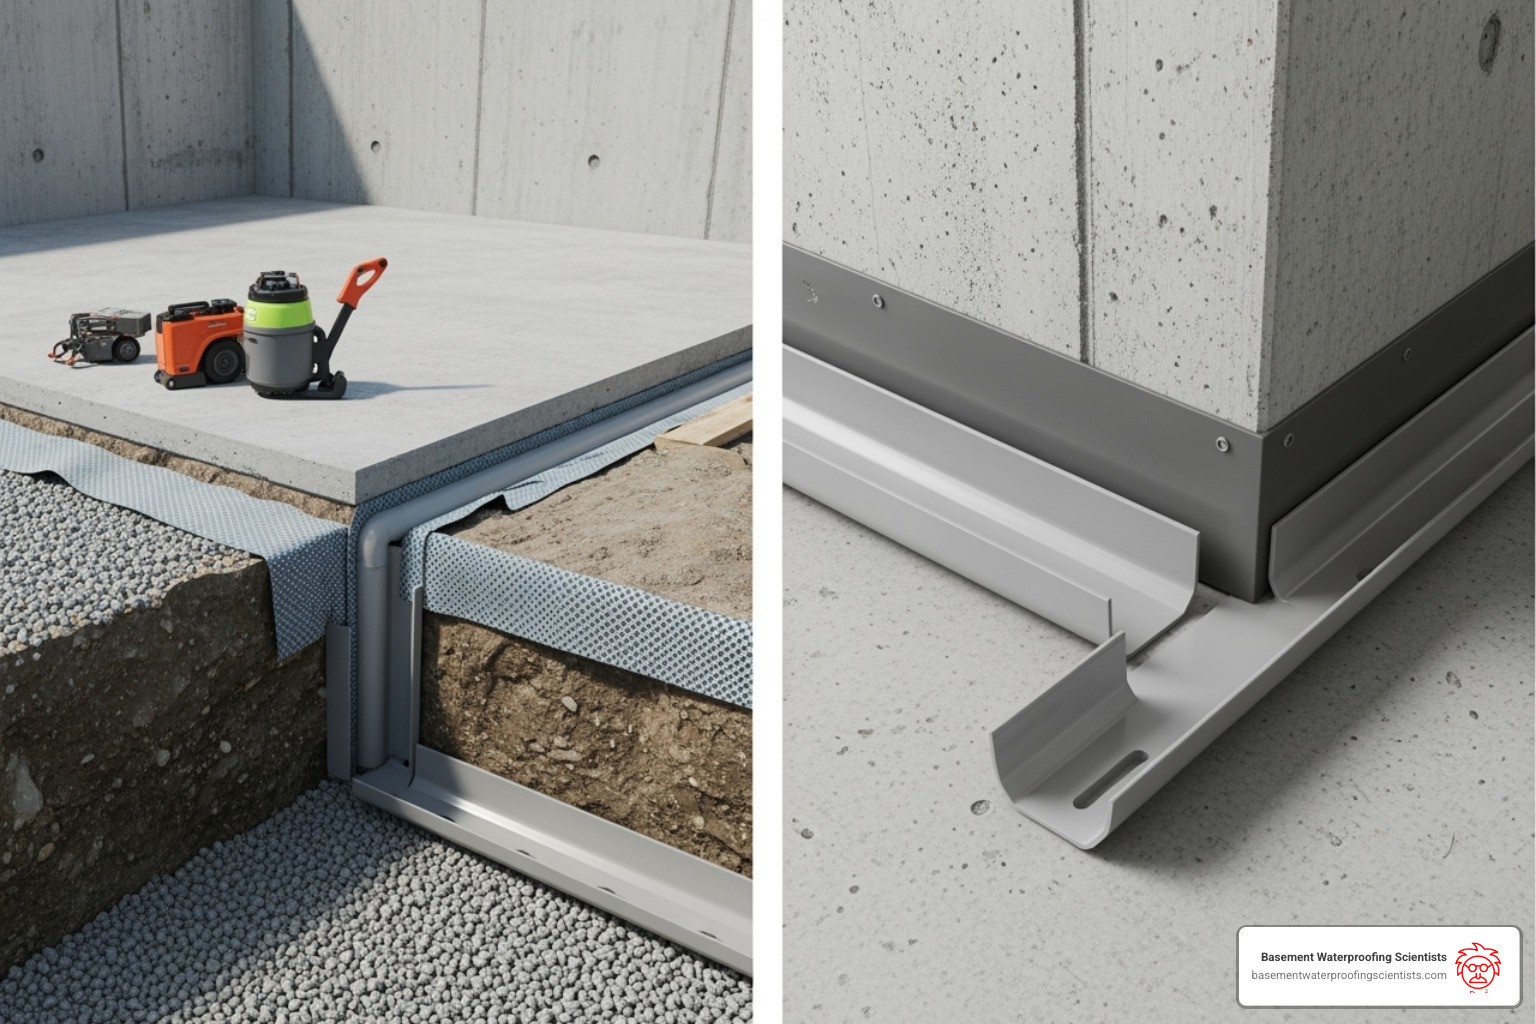
- Channel Body (PVC/HDPE): This is the main highway for water, typically made from super-durable PVC or high-density polyethylene (HDPE). These tough plastics are built to handle lots of water flow without getting squashed or kinked. You might see systems like Delta Channel, which have precise dimensions, for example, a width of 80 mm and a height of 50 mm, designed for maximum efficiency.
- Wall Flange: Many channels come with a clever vertical wall flange and spacers. This design allows any water seeping down your basement walls to flow directly into the drain line, keeping those walls dry and preventing puddles on your floor.
- Perforations/Inlet Holes: These are strategically placed openings along the channel. They’re the entry points, allowing water from the floor-wall joint and even from beneath your concrete slab to enter the system.
- Drainage Stone: We lay down clean, washed drainage stone both beneath and around the channel. This stone acts like a natural filter, stopping tiny soil particles from clogging the system, while also creating a clear, easy path for the water to flow.
- Vapor Barrier: Often, a vapor barrier is placed over the drainage stone and under the new concrete we pour. This barrier is a real hero, preventing moisture from rising through the slab and helping to keep the area around the channel nice and clean.
- Clean-out Ports: These are vital access points built right into the system. They make it incredibly easy to inspect and maintain your system, ensuring the channel stays free of debris and clogs for years to come.
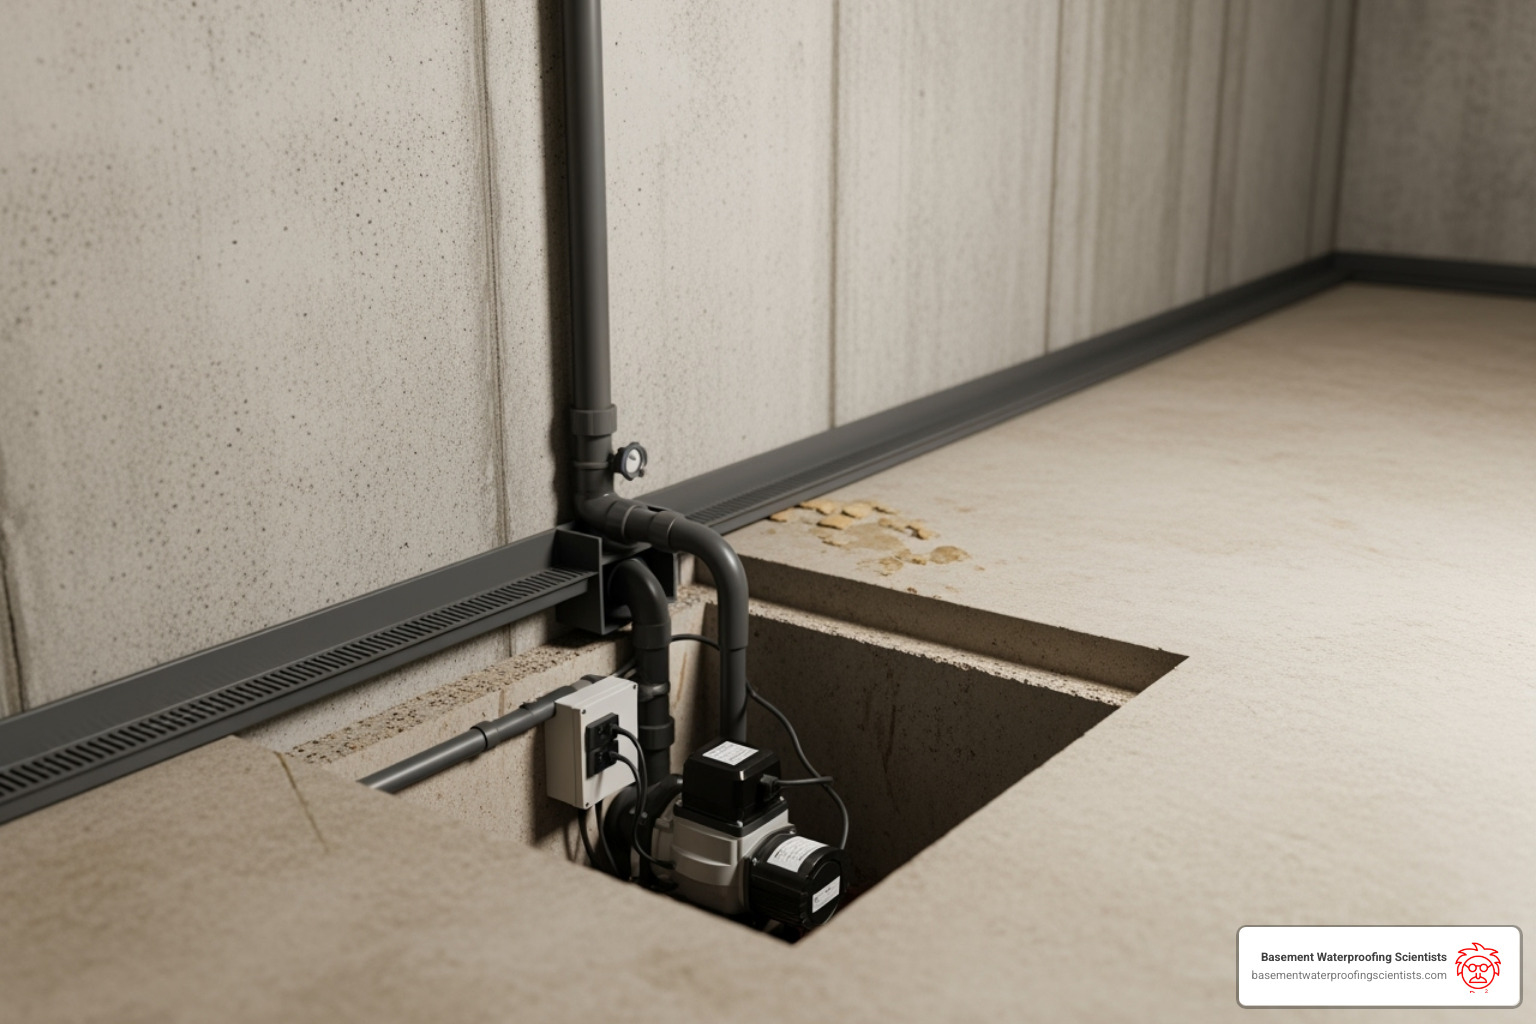
- Sump Pit: This is the collection point, a basin usually located at the lowest spot in your basement, where all that channeled water gathers.
- Sump Pump System: Ah, the true heart of the system! Once water reaches a certain level in the sump pit, this powerful pump automatically kicks in, sending the water safely away from your foundation and outside your home. Without a reliable sump pump, your drainage channel would simply fill up and overflow right back into your basement – and nobody wants that! You can dive deeper into this critical component here: Sump Pump for Basement.
A perimeter drain system and sump pump is the most effective way to collect water:
The Importance of Proper Slope and Flow
You might think water just naturally finds its way downhill, but for an interior drainage system to truly shine, gravity needs a little expert guidance. That’s where the importance of proper slope comes in. Our systems aren’t just thrown in; they are carefully installed with a precise gradient to make sure water collection and movement are as efficient as can be.
The gold standard for effective water flow in drainage channels is a 2% slope. What does that mean in real terms? It’s about 1/4 inch of drop for every 10 feet of channel. This might seem like a small detail, but it’s absolutely crucial. This slight incline ensures that all the collected water flows steadily and consistently towards your sump pit, preventing any standing water from lingering within the channel itself. Standing water can lead to unpleasant odors, stagnant conditions, and even sediment buildup over time, which we want to avoid!
Without the correct slope, water might just sit there in sections of the channel, making the whole system less effective. This precise engineering is what truly makes a properly installed system an “engineering marvel,” as some experts describe it. For instance, specialized systems are designed to avoid the “mud zone” and prevent clogging, issues that often plague exterior drainage systems. If you’re curious about why water might be standing in your drain, you can learn more here: Basement Drain Has Standing Water.
Our commitment to precise installation means we ensure optimal flow and truly efficient water management, giving you a reliably dry basement. This scientific approach to managing water, backed by decades of experience, ensures long-term reliability for your home. You can even find fascinating research on preventing basement leakage, like this study from the USDA: USDA research on preventing basement leakage.
Choosing Your System: Types of Interior Basement Drainage Channels
Just like every home is unique, so is its battle against basement water. There isn’t a single, magic solution that fits everyone. The ideal basement perimeter drain channel for your home truly depends on a few key things: your specific foundation type, how thick your concrete slab is, and exactly how water is making its way into your space. While we pride ourselves on offering customized solutions custom just for you, interior perimeter drain channels generally fall into two main categories:
Understanding the ins and outs of each type helps us recommend the perfect basement waterproofing solution to keep your home dry and healthy. Ready to dive deeper into all our waterproofing options? You can explore our full range of solutions here: Basement Waterproofing Solutions.
Sub-Floor Perimeter Channel (Below-Slab)
Think of this as the “gold standard” in basement waterproofing. A sub-floor perimeter channel is installed neatly out of sight, directly beneath your concrete floor, right along the interior edge of your basement walls.
So, how does it work its magic? Our team carefully removes a narrow section of your concrete slab around the perimeter. Then, we excavate a trench, lay the specialized drainage channel in place, surround it with clean drainage stone to act as a filter, and finally, restore the concrete. Once we’re done, the system is completely invisible, preserving the clean look of your basement.
This method offers maximum effectiveness because it captures water from both the wall-floor joint and from under the entire slab, providing superior water collection and relief from hydrostatic pressure. Plus, these interior systems are built for durability, often lasting 20 years or more with very little maintenance. That’s a much longer lifespan than exterior French drains, which tend to clog up within 10-15 years.
Of course, there are a few things to consider. The installation is a bit more invasive, as it involves cutting and removing concrete. This can create some dust, but don’t worry, we use advanced dust control measures to keep things as tidy as possible. As for cost, you can expect the average Sub-Floor Perimeter Channel to range from $4,000 to $6,000. This system is truly a permanent fix for most basement water problems and is our most popular choice. To learn even more about how our interior drainage systems protect your home, click here: Interior Drainage System.
Baseboard / Above-Floor Channel
Sometimes, a sub-floor installation isn’t the best fit. This is often the case with certain foundation types, like monolithic slabs, where the footing and floor are poured as one single unit. For these situations, a baseboard or above-floor channel offers a fantastic alternative.
This system is installed directly on top of your basement floor, hugging the perimeter walls. We adhere it securely to the concrete floor using special, watertight sealants. Some of these systems even use unique adhesives that activate with moisture, bonding even in wet conditions! The big advantage here is that there’s no jackhammering, digging, or hauling mud required. This makes for a much less invasive and often quicker installation, with many systems completed in just 1-2 days. It’s particularly monolithic slab friendly, designed specifically for homes where traditional below-slab drains would be tricky.
While it is visible as it sits on top of your floor, these systems are designed to be quite aesthetic, blending in with a discreet, baseboard-like appearance. In terms of effectiveness, it’s highly efficient for stopping water that seeps through walls and the floor-wall joint. However, it may not capture water from deep under the slab quite as comprehensively as a sub-floor system. The average cost for a Baseboard/Above-Floor Channel typically ranges from $3,500 to $5,000. Many homeowners prefer this option for its cleaner, less disruptive installation process.
Types of Interior Basement Drainage Channels
| Feature | Sub-Floor Perimeter Channel | Baseboard / Above-Floor Channel |
|---|---|---|
| Location | Below the concrete slab | On top of the basement floor |
| Installation | Requires concrete removal, 1-2 days | No jackhammering, 1 day |
| Visibility | Hidden after installation | Visible as a baseboard |
| Effectiveness | Maximum, handles high water volume | Good for moderate seepage |
| Maintenance | Easy, via interior clean-out ports | Easy, via accessible ports |
| Cost | $4,000 – $6,000 | $3,500 – $5,000 |
| Best For | Most basements, high water tables | Monolithic slabs, minimal disruption |
*Basement Waterproofing Scientists specializes in interior drainage solutions custom to your basement’s unique needs.
The Installation Process: From Concrete Cutting to a Clean Finish
Installing a basement perimeter drain channel might seem like a daunting project, but with the right team, it’s a smooth process that transforms your wet basement into a dry, usable space. While you might find DIY guides online, this isn’t a weekend warrior project. Professional installation ensures your system works perfectly and doesn’t compromise your home’s structural integrity.
Our experienced crews have refined this process over decades, and we know how to minimize disruption while delivering exceptional results. As This Old House guide to basement waterproofing emphasizes, proper installation is crucial for long-term success.
One customer from Bensalem Township told us they were initially nervous about the jackhammering process. After seeing our clean, professional work, they were thrilled with the results. That’s the kind of experience we strive for every single day.
Step 1: Trenching the Perimeter
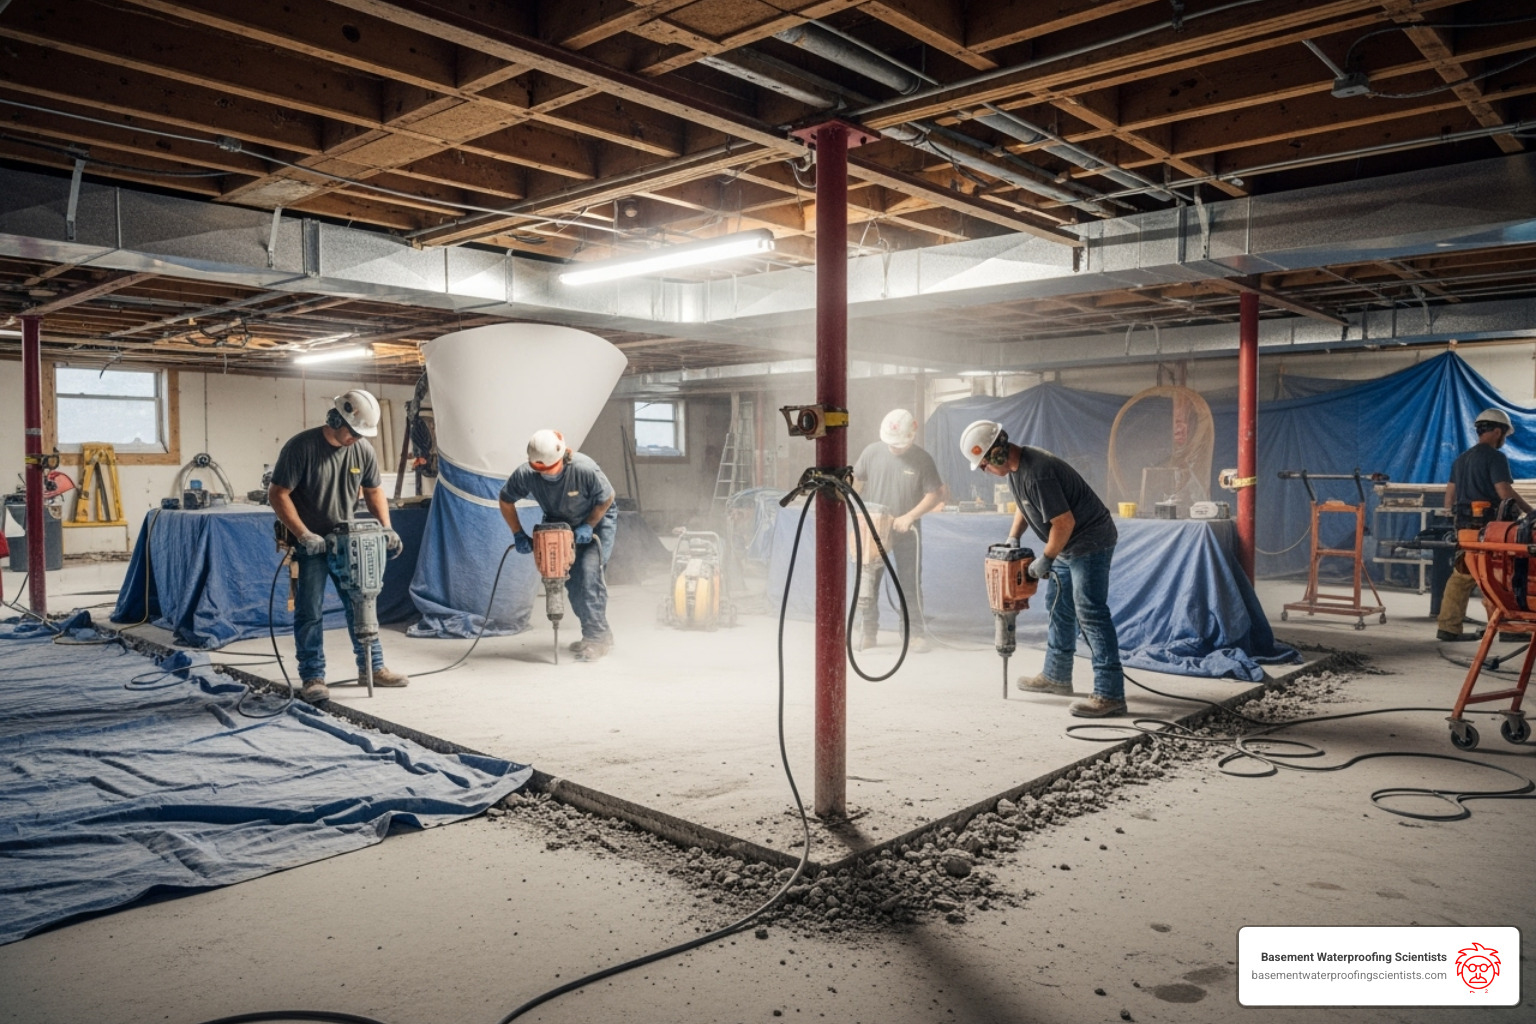
The first step sets the foundation for your entire drainage system. For a sub-floor basement perimeter drain channel, we begin by carefully marking the perimeter of your basement. Using specialized concrete saws, we make precise cuts in your basement floor, typically creating a channel that’s 8-12 inches wide.
Next comes the jackhammering phase. Don’t worry – we use advanced dust control systems to keep your home as clean as possible during this process. The concrete removal creates a trench that’s usually 8-10 inches deep, providing the perfect space for your new drainage system.
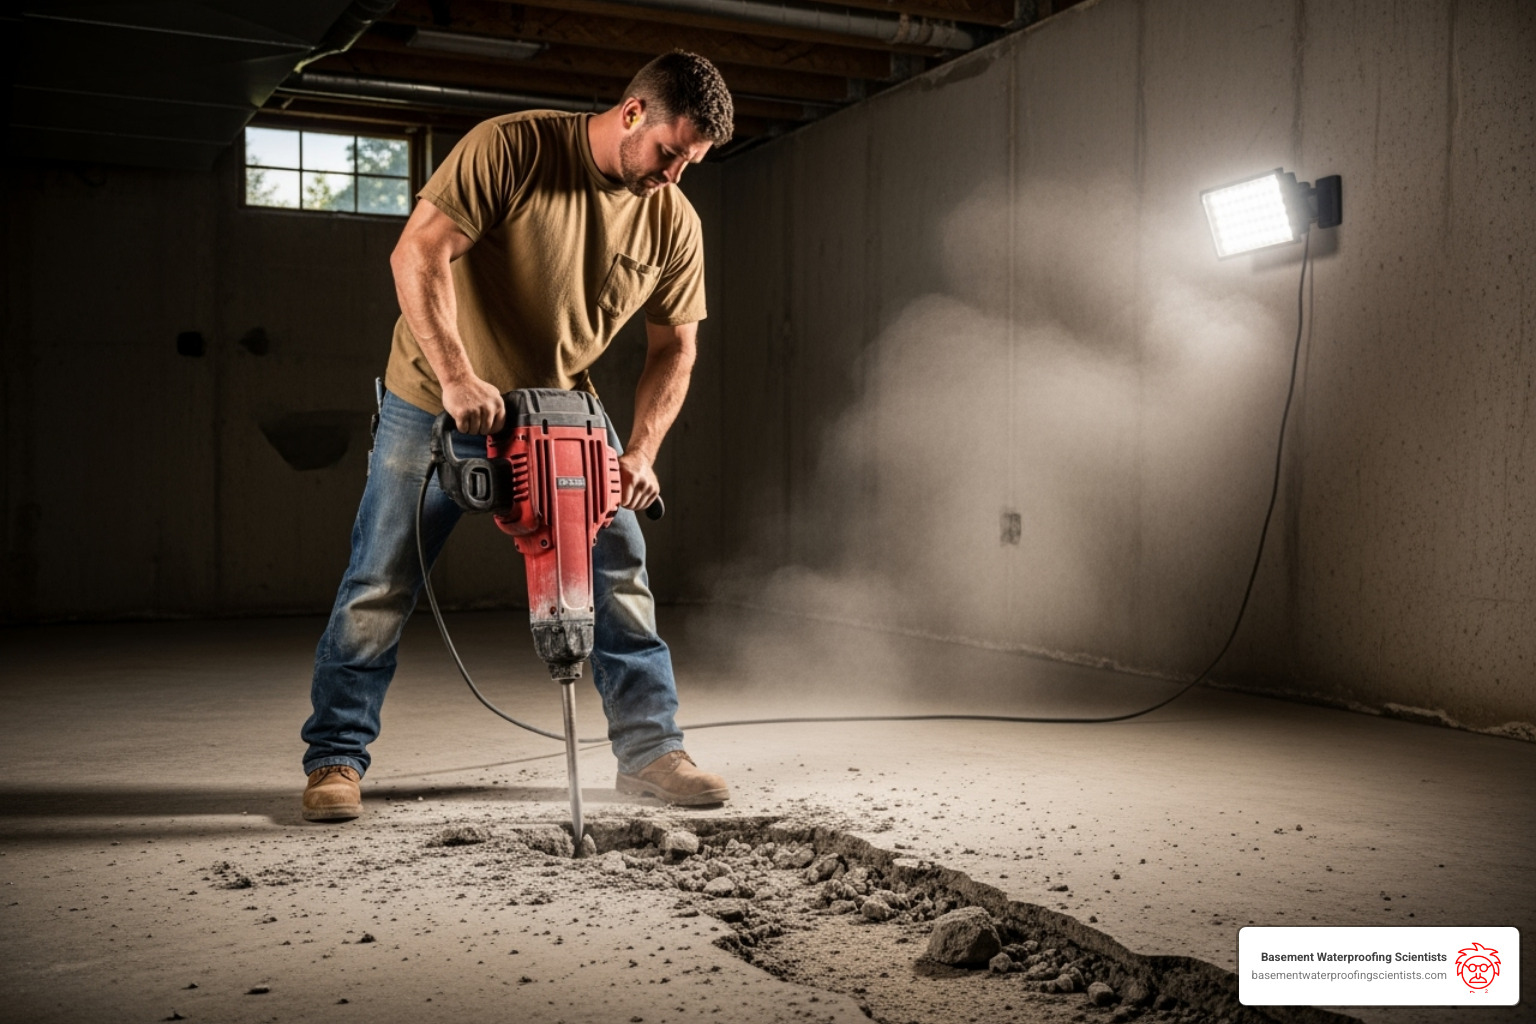
All concrete debris is promptly removed from your home. We understand this is your living space, and we treat it with the respect it deserves. For baseboard systems, this entire step is skipped, which means less mess and faster installation.
Step 2: Laying the Foundation for Drainage
With a clean trench ready, we create the perfect environment for effective water collection. Clean drainage stone is carefully laid at the bottom of the trench. This isn’t just any gravel – it’s specially selected stone that acts as a natural filter, preventing fine particles from clogging your system while creating clear pathways for water flow.
If your system includes a sump pump (and it absolutely should!), we install the sump pump liner at this stage. This liner becomes the collection basin where all the water from your perimeter system will gather before being pumped safely away from your foundation.
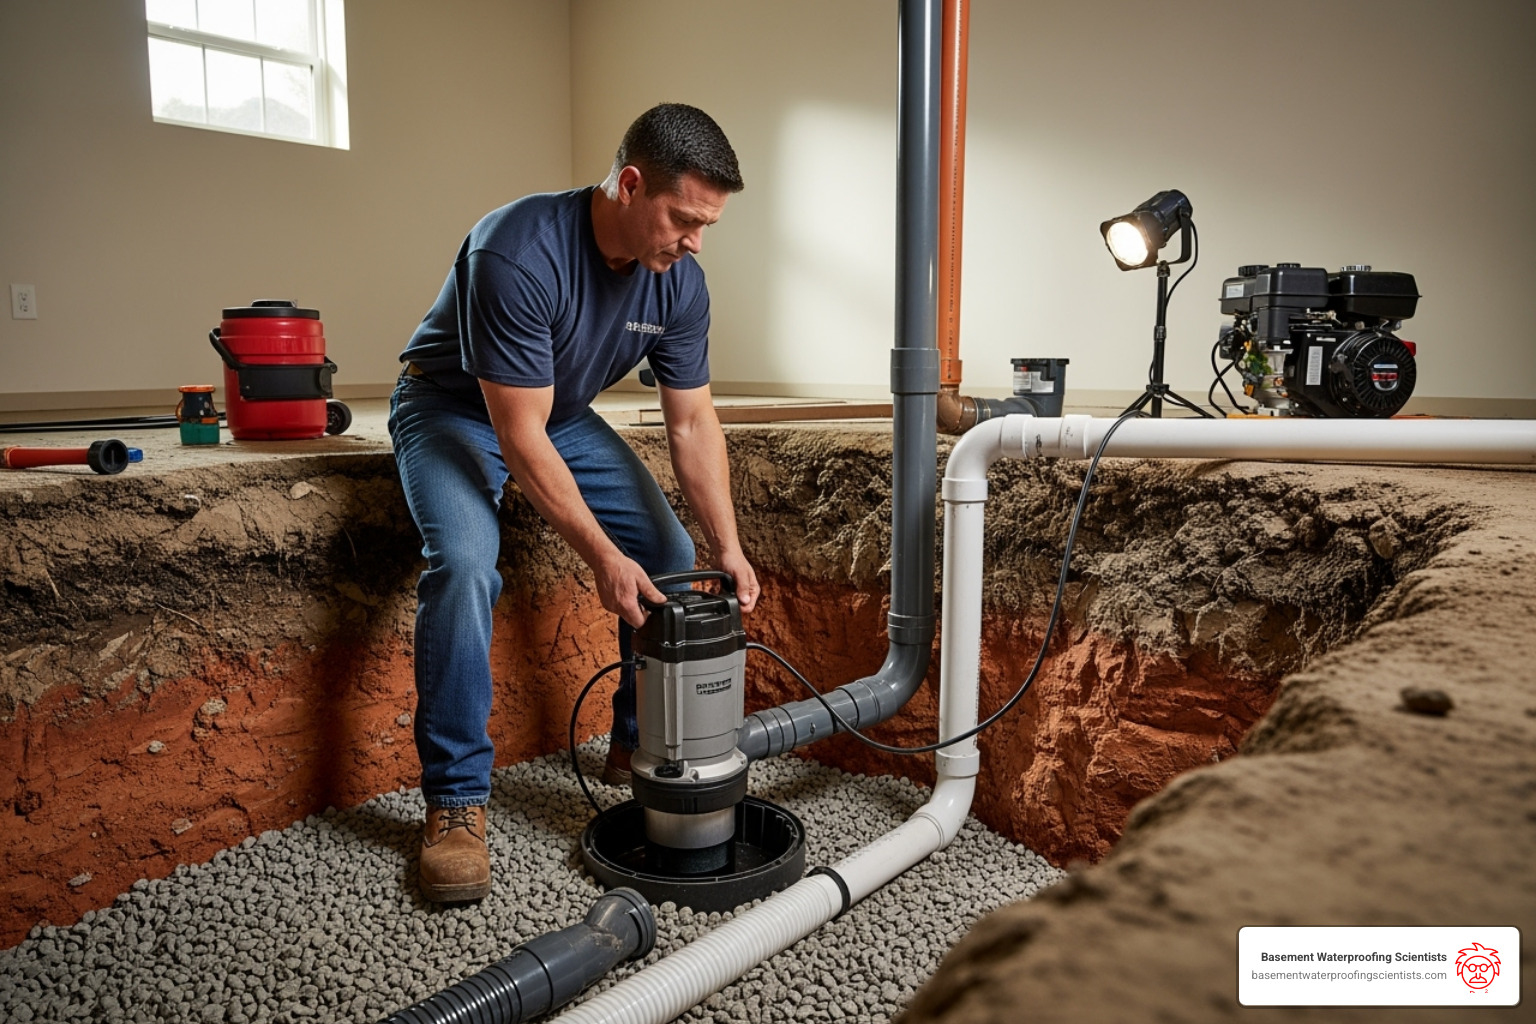
Creating this filter bed is crucial for long-term system performance. It ensures water flows freely while keeping sediment and debris out of your drainage channel.
Step 3: Installing the Channel and Restoring the Floor
Now comes the heart of the system. The basement perimeter drain channel sections are carefully placed into the prepared trench. Each section connects seamlessly to the next, creating a continuous pathway that guides water around your basement’s perimeter.
We pay special attention to the wall flanges during this phase. These vertical extensions ensure that water seeping down your basement walls flows directly into the drain line instead of pooling on your floor. The entire channel system is then connected to your sump pit, completing the water collection circuit.
Crucial 2% slope we mentioned earlier? This is where that precision engineering comes into play. Every section is carefully positioned to maintain proper gradient, ensuring water flows steadily toward the sump pump without creating any standing water areas.
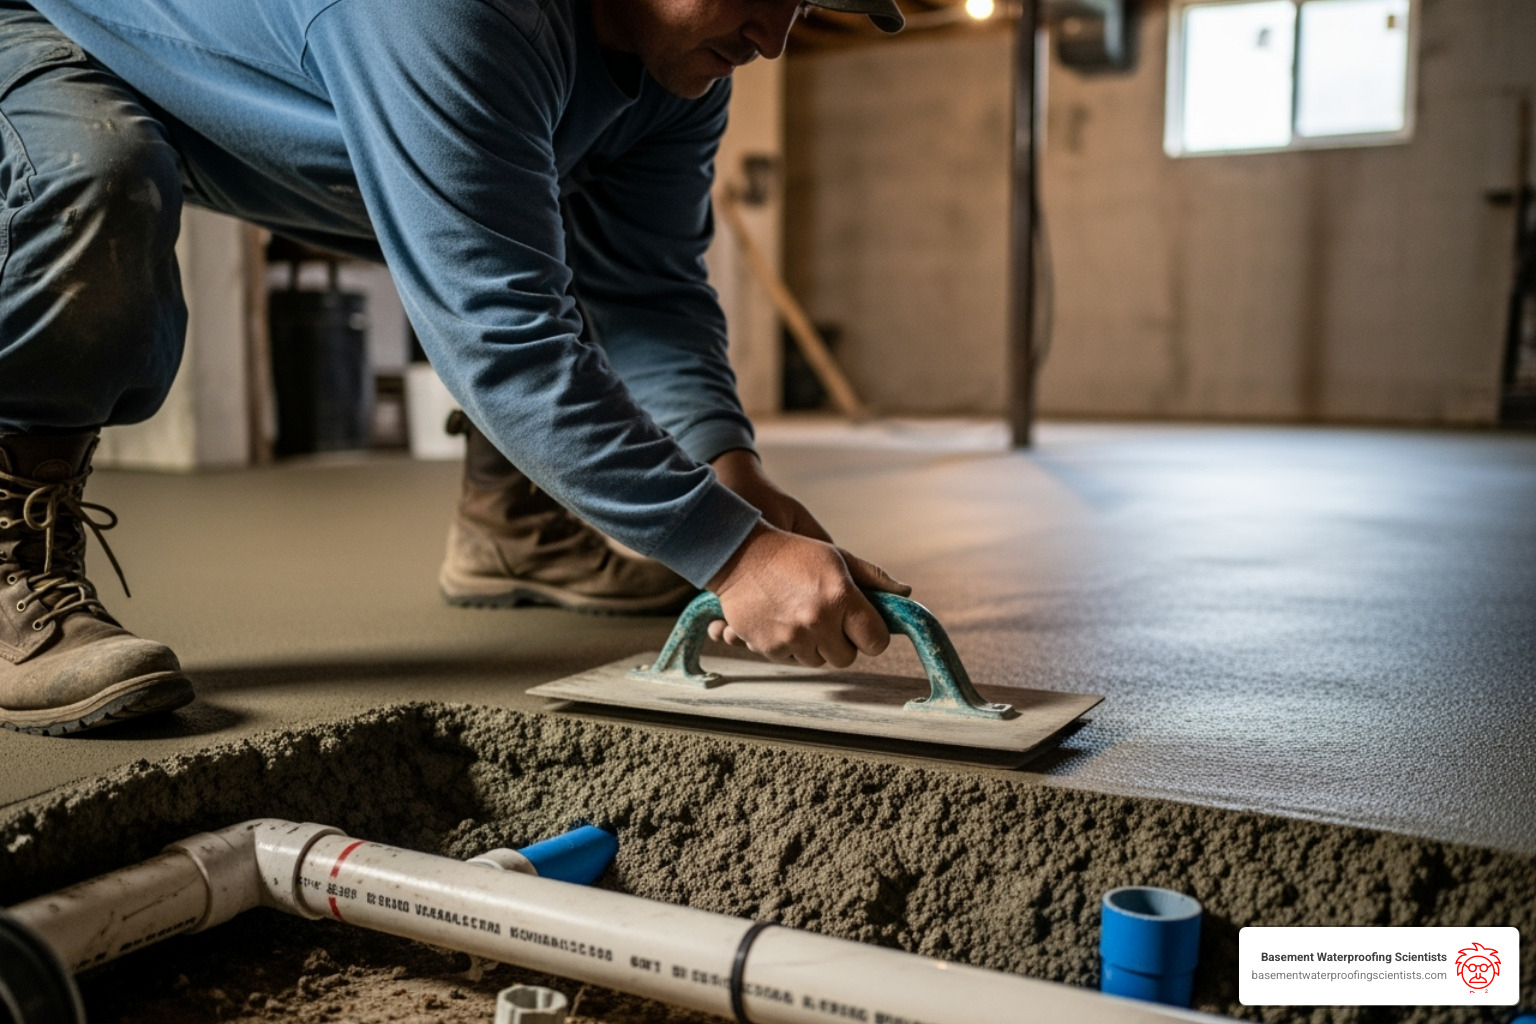
Once the channel is secure, we backfill the trench with more drainage stone. Finally, we pour high-strength concrete over the channel and stone, creating a smooth finish that blends seamlessly with your existing floor. The restored floor maintains its full load-bearing capacity and looks like the work was never done.
Step 4: Final Cleanup and System Test
Our job isn’t finished until your home is cleaner than when we arrived. We remove all waste and debris, thoroughly clean the work area, and ensure everything is spotless. This attention to detail is what sets professional installation apart from DIY attempts.

Before we leave, we perform a comprehensive system flush test. We introduce water into the system to verify it’s channeling efficiently to the sump pump. This final inspection ensures your new basement perimeter drain channel is ready to protect your home for decades to come.
The entire installation process typically takes 1-2 days, depending on your basement’s size and complexity. When we’re done, you’ll have a permanent solution that addresses the root cause of your basement water problems, not just the symptoms.
Frequently Asked Questions about Basement Perimeter Drain Channels
We understand that thinking about a major home improvement like a basement waterproofing system can bring up a lot of questions. That’s perfectly natural! We’re here to help clear things up and give you the peace of mind you deserve. Here are some of the most common questions we hear, answered simply and clearly.
Do I absolutely need a sump pump with my basement drainage channel?
Yes, absolutely! Think of your basement perimeter drain channel as the ultimate water collector. It’s diligently gathering all that seeping groundwater, directing it away from your basement walls and floor. But once that water is collected, it needs somewhere to go!
That’s where the sump pump comes in. It’s the “evacuation team” for your system. Without a reliable sump pump to kick in and pump the collected water safely away from your home, your drainage channel would simply fill up and, well, overflow right back into your basement. We always recommend pairing your drainage channel with a high-quality sump pump, ideally one that includes a battery backup. This is your extra layer of protection, ensuring your system keeps working even if the power goes out during a heavy storm.
Will installing a basement perimeter drain channel weaken my concrete floor?
This is a very common and understandable concern, but rest assured, no! When a basement perimeter drain channel is installed correctly by experienced professionals, it absolutely will not weaken your concrete floor.
Our team uses specialized concrete saws to make precise, narrow cuts along your basement’s perimeter. We only remove the minimal section needed for the drainage system. Once the channel is in place, surrounded by clean drainage stone, we carefully restore the area with high-strength concrete. This new concrete bonds seamlessly with your existing slab, ensuring your floor maintains its original strength and can handle all the same loads as before. This isn’t a DIY project for a reason; precision and proper materials are key to a lasting, strong result. You can trust that your concrete will be just as robust as it was.
How do I maintain my drainage system for a long life?
One of the best parts about our interior basement perimeter drain channel systems is how little maintenance they require! Unlike those exterior French drains that often clog up with dirt and roots within 10-15 years, our interior systems are designed for long-term, clog-free performance, typically lasting 20 years or more. They really are built to last.
While they’re low-maintenance, a little proactive care goes a long way to ensure your system continues to protect your home effectively for decades. We recommend a few simple steps. Firstly, regularly inspect the clean-out ports and any visible parts of the channel for debris. It’s a quick check that can spot potential issues early.
Secondly, you should test your sump pump annually. This is crucial! Simply pour a bucket of water into the sump pit to ensure the pump activates, drains the water, and then shuts off properly. This simple test can prevent a lot of headaches down the road.
Finally, for complete peace of mind, we suggest a professional servicing every 3-5 years. Our experts at Basement Waterproofing Scientists can perform a thorough flush of the clean-out ports, identify any potential issues, and ensure all components are working optimally. This minimal routine helps guarantee your basement perimeter drain channel remains your home’s steadfast protector.
Conclusion: Reclaim Your Basement and Protect Your Investment
You know that feeling, don’t you? Stepping into a damp, musty basement. It’s more than just an annoyance; it’s a real threat to your home’s structural integrity, your family’s health, and even your property’s value. Just hoping the problem goes away usually leads to more extensive and costly repairs down the line.
But here’s the good news: there’s a lasting answer. A basement perimeter drain channel isn’t just a temporary patch; it’s a permanent solution designed to tackle the very root cause of water intrusion. By effectively managing hydrostatic pressure and gently guiding water away from your home, it works wonders. It protects your foundation, eliminates those unpleasant damp smells, and transforms that forgotten, unusable space into a dry, healthy, and truly valuable part of your living space. That incredible peace of mind that comes with a reliably dry basement? It’s truly priceless, as one Doylestown customer perfectly summarized.
At Basement Waterproofing Scientists, we’ve been helping countless homeowners like you for over 30 years. We specialize in providing customized, effective, and lasting solutions. Our unique approach means we use specialized equipment to pinpoint exactly why your basement is leaking, allowing us to fix leaks for less. We combine expert inspections with competitive pricing and back our work with a lifetime guarantee, because your satisfaction and a dry basement are our top priorities. We’re here to help you reclaim your basement and protect your most important investment.
Ready to say goodbye to the dampness and hello to a usable, protected basement? For a comprehensive evaluation and a permanent solution to your basement water problems, explore our Basement Drain Systems.